
Mastering Speedlights for the Wedding and Portrait Photographer with Michael Anthony
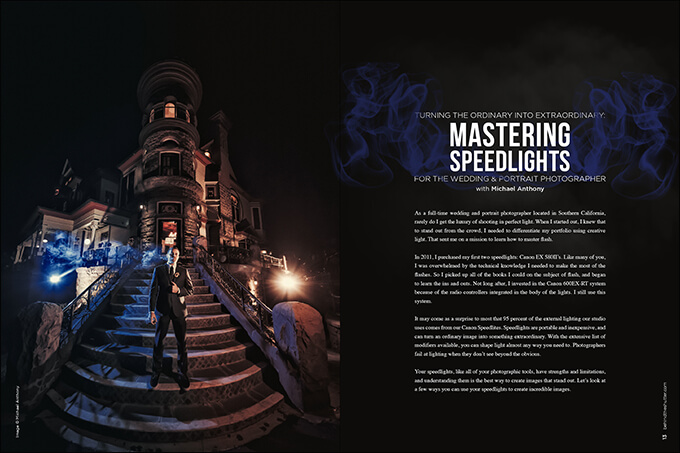
As a full-time wedding and portrait photographer located in Southern California, rarely do I get the luxury of shooting in perfect light. When I started out, I knew that to stand out from the crowd, I needed to differentiate my portfolio using creative light. That sent me on a mission to learn how to master flash.
In 2011, I purchased my first two speedlights: Canon EX 580II’s. Like many of you, I was overwhelmed by the technical knowledge I needed to make the most of the flashes. So I picked up all of the books I could on the subject of flash, and began to learn the ins and outs. Not long after, I invested in the Canon 600EX-RT system because of the radio controllers integrated in the body of the lights. I still use this system.
It may come as a surprise to most that 95 percent of the external lighting our studio uses comes from our Canon Speedlites. Speedlights are portable and inexpensive, and can turn an ordinary image into something extraordinary. With the extensive list of modifiers available, you can shape light almost any way you need to. Photographers fail at lighting when they don’t see beyond the obvious.
Your speedlights, like all of your photographic tools, have strengths and limitations, and understanding them is the best way to create images that stand out. Let’s look at a few ways you can use your speedlights to create incredible images.
Flag and Bounce
This technique allows you to use your speedlight to create both soft and controlled light in almost any situation. A telltale sign of an image that is “flashy” is that the light quality does not match the quality of ambient light. If you are shooting images inside in poor but even lighting, the light on your subject should be soft. If you are outdoors in 12 o’clock sunlight, your light should be hard. This makes for images that are believable to the eye.
If you are like me, you hate carrying a lot of gear with you on shoots. You can carry softboxes and umbrellas, but why do it if you don’t need to? On a wedding day, if I am shooting inside a dimly lit room but I want to use soft light, one of the best ways to do that is to use a close wall to bounce a speedlight off of. You can do this inside or outside, and both yield incredible results. When in brighter light, just remember that bouncing your flash will cost you some power, so when using speedlights, keep your subject close to the light source (wall).
It seems obvious, and it is a fairly basic technique. The reason it doesn’t often look good is because while the soft light hits your subject, it also spills uncontrollably throughout the room.
In order to control this, you need to flag your flash. You can buy fancy modifiers to do this, but a large gray card or the black side of a reflector works perfectly. By flagging your light, you can control exactly where you want light to go, without causing distracting light spill everywhere else in the room.
This works wonders during bridal and groom prep, and allows you to leave the heavy modifiers in the car until you need them.
Create Mystery or Separation With Backlight
I stay away from the word backlight because it contains a connotation that I hear every other Southern California “natural light” photographer use when describing how to make bad light better. So there is no confusion, backlight does not fix blown highlights or crushed shadows. Now that we have established that, let’s talk about the best times to use backlight with a speedlight.
By placing your speedlight behind your subjects, you can create a bit of mystery in your images. Backlight also allows you to create separation between your subject and the background, and can add a dynamic feel to an already well-lit image.
I use backlight in a dark environment for the last image in an album spread. This way I create a quick, well-composed image that I can rely on as an album closer every single time. Backlight should not be a distraction. You need to consider both the power of the light and the placement, as backlight can spill onto the front of your subject’s face. By offsetting your couple, you can use the same bounce techniques described above to create a bit of light on one of your subjects’ faces, even if the light is completely behind them.
When using backlight with a subject with long hair, place all of the hair on the subject’s back to avoid the appearance of hair growing out of the subject’s chin, and emphasize the subject’s shape.
Add a backlight to a front-lit subject for a dynamic portrait that allows for a beautiful halo on your subject.
Use a speedlight to backlight water, smoke or any other semi-transparent material to create a pattern to shoot through, adding depth to your composition. Whatever you are shooting through has to be lit on the opposite side of your camera. We use this technique all the time to take our subjects out of otherwise boring or cluttered backgrounds.
Stack Lights to Add or Conserve Power
Flash power can be cumulative, meaning that if you need more power out of your flash, you can add an additional one to double your power. This way you can overpower the sun or conserve battery power for your light when either outcome is needed.
While I highly recommend shooting with a single light source, the cost of investing in a system like the Profoto B1 could be prohibitive. By combining multiple flashes, you get additional power out of your small AA-powered speedlights. In addition, you can use four flashes set to one-quarter power, and conserve battery power and recycle time to get more efficient use out of your flash. For bonus points, spread out the flashes to simulate a larger light source and get softer light on your subjects. To do this, you will need one or more assistants, or a flash bracket that can hold multiple lights, like the Westcott Triple Threat.
Every flash you add increases your power, but remember that the same system for calculating your F-stops applies. So, if you want to double the flash power of one light, you need to add another light. If you want to double the power of two lights, you need to add two more lights. If you want an additional stop of power, you need to add four lights or invest in a powerful moonlight, such as the Profoto B1 or B2.
Sandwich Your Subjects to Create Showstopping Light
It’s rare that I use more than two lights on a subject outside the studio. When using multiple lights, I employ a cross light 90 percent of the time. Natural lights all look similar because our planet has only one sun, and natural light falls from east to west (when rare circumstances like reflections do not apply). This means that if you want dynamic images that catch people’s attention, adding a second light can help.
When experimenting with lighting, start by placing your second light directly opposite your primary light. Dial in the ambient exposure first, and then your primary light, and lastly your kicker. This creates separation and three-dimensionality that is sure to give you a beautiful photo if you nail the pose and composition.
Blend Your Ambient Light With Flash
When you get that flash out for the first time, you may tempted to crush that ambient light into oblivion and blast your subject with flash so that when you look at the back of the camera, you can see the results of your hard work. I’ve been that guy way too often.
When you develop your skillset, you begin to understand that the difference between ordinary and extraordinary images comes down to the subtle details: hand placement, shadow length, dress position, etc.
One of the other telltale signs of flash use is an imbalance between flash and ambient light. While there is no straight rule for proper ratio of flash to ambient light, there are guidelines. Generally, if you leave enough ambient light to show detail in your shadows, you are in better shape than underexposing significantly. Use your histogram when shooting your ambient light test shot to avoid clipping your blacks. Conversely, your flash power has to be stronger than the ambient light in the scene; otherwise, you won’t see the flash. A darker ambient exposure gives you a more dramatic look so you can make your subject the brightest part of your image. A more balanced exposure gives you a more natural appearance.
Your style of photography dictates which way to balance light. Make sure your balance is closer to even than it is to unbalanced.
Control Your Shadows
Shadows can give you drama and help shape your subjects or scene. Speedlights are small light sources that leave you with sharp shadows. Shadows from your flash can detract from your image. To control shadows, feather your light source up to take some light off the floor or walls. Add grids or snoots to your flash to pinpoint the light exactly where you want it. In the worst-case scenario, take a plate shot without your flash so you can paint out the shadows later in post-production. Just don’t rely on this technique too often.
You need to understand your tools. Portrait and wedding photographers don’t all have the luxury of time or assistants when lighting on location. Speedlights are important tools that are easy to use and learn. Even “natural light” photographers can get the bright and airy look using speedlights, while the edgy, fashion-inspired photographer can use them to create shadows and drama.


