Product Photography Lighting Basics with Michael Corsentino
We’re all exposed to product photography every single day of our lives, so there will always be a strong demand for it. This month, I take a look at some of the basic concepts of product photography and how to approach lighting and other technical details. Adding product photography to your services can be extremely profitable. But these tips are helpful whether you want to start doing it professionally or just sell some stuff on eBay.
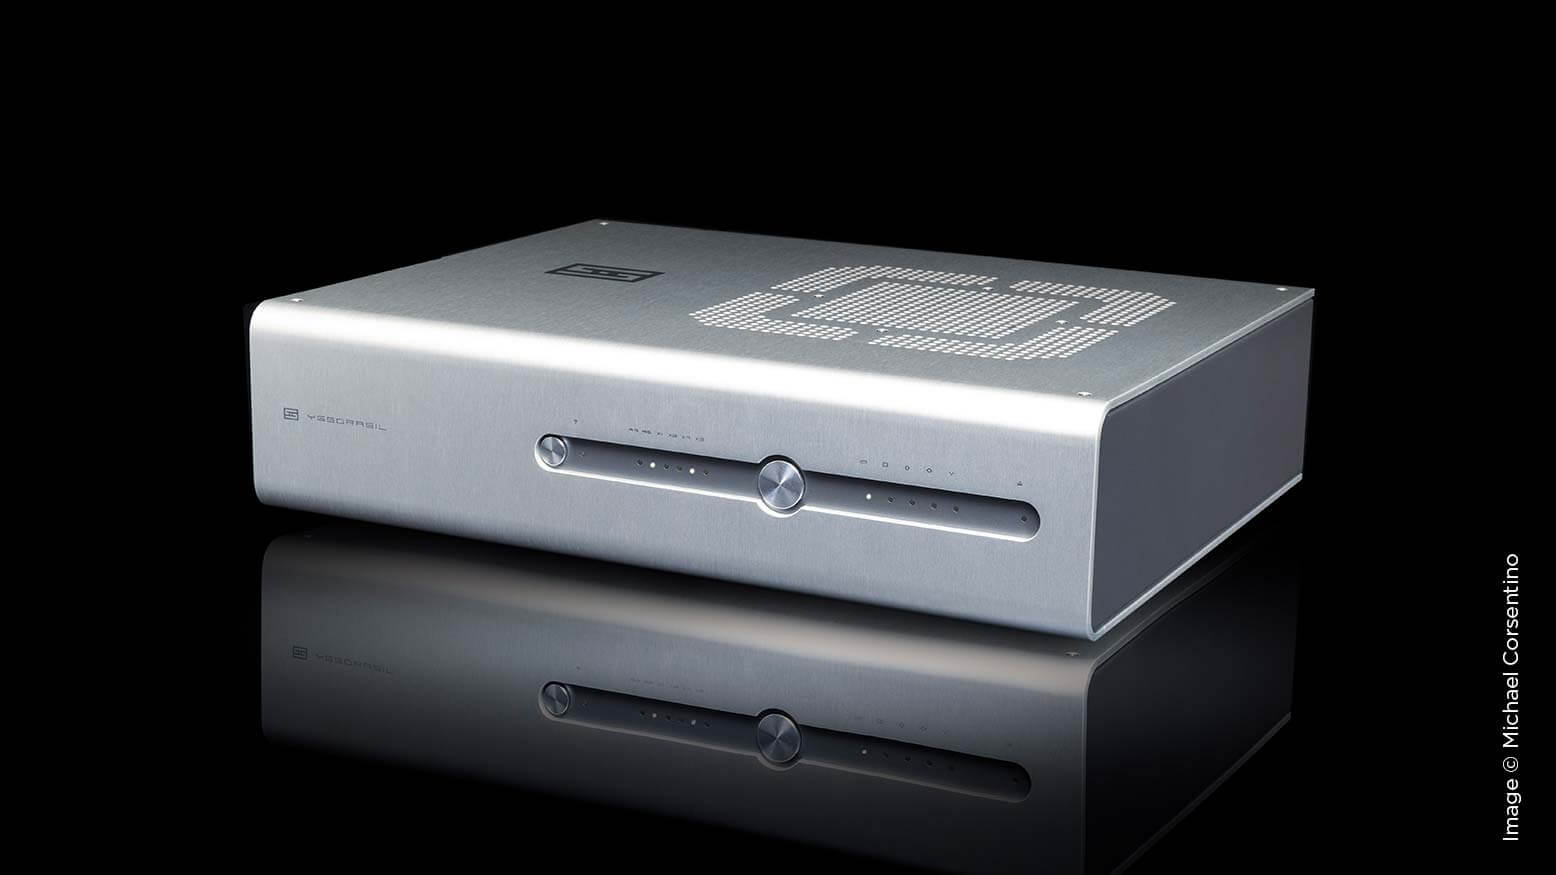
One of the bonuses of product photography is the lack of the logistics, time constraints and budgetary concerns encountered with location shoots and managing creative teams. It’s just you alone in your studio with a product and your lights. You get to Zen out, put on some music and spend as much time as you need noodling and finessing everything until it’s perfect. For me, that’s heaven. Let’s look at how I approached a recent shoot of high-end stereo components for a leading stereo magazine.
Research
With any new assignment, especially in an area new to me, my first step is research. I learn the norms and conventions for that type of work, who the best practitioners are and what they’re doing, what clients they’re working with, and what their work looks like. From there, I start winnowing down the styles that appeal to me, thinking about new things I can bring to the table and reverse-engineering the technical aspects I’m seeing.
I also seek technical guidance by reaching out to anyone I can who has experience doing this type of work. What are the best practices? How are they lighting their images? How many lights are being used? What tools and accessories are needed? Do I have the necessary equipment or do I need to budget for that? What kinds of surfaces are they shooting on—stone, wood, white, black? What are they using to create those shiny black-and-white bases we see under every product? How are they creating product reflections while minimizing unwanted reflections from lights? What kinds of backgrounds are they using? Is the majority of their work done in studio, in environments or a mixture? What should I charge?
You’d be surprised how willing people are to share with you when you approach them the right way. Keep in mind this is their livelihood that you’re inquiring about, so tread lightly. Make it clear, whether it’s true or not, that your goal is not to eat their lunch. Tell them you share a genuine love for this type of work, and your goal is to get better at it. This has been a winning approach for me.
Shooting Surfaces
My research told me the variety of common styles with which stereo components are shot. They include straightforward studio shots on matte and gloss white and matte and gloss black; more stylized studio work using exotic surfaces like rare woods, metals, veneers, fabrics, gel and effect-driven looks; and products shot in environmental lifestyle settings.
I learned that the gloss and matte black-and-white surfaces I’d been seeing were a common material known as Formica. I sourced four large 4×8-foot and 4×10-foot sheets of Formica from a local cabinet materials warehouse. They were relatively inexpensive, around $30 each. They’re thin, and can be rolled up for easy transport in a hatchback.
I got two black sheets in a matte and gloss finish and two in a white matte and gloss finish. Since this job called for basic studio shots, this combination would cover the bases and allow me to create a variety of options for my client. I also learned that the Formica sheets were best hung on a wall either separately for easier staging or together if wall space is a premium. If you’re going the second route, store each sheet with a protective sheet of plastic or craft paper between them to prevent scratches. To hang the sheets of Formica, simply drill two holes, one in each corner along the short edge of the sheet. Leave a few inches of space between the edge and each hole to support the weight of the sheet while it’s hanging.
Worktable
Next I’d also need a large worktable to support the products I’d be shooting and provide a base for the Formica sheets. There are frosted Plexiglas still-life tables available that allow lighting from below, among other things, but they’re large, costly and a bit dated. I preferred something I could easily store.
To accomplish this, I built a simple, sturdy and fairly reasonably priced worktable using two half-inch sheets of 4×8-foot CDX plywood glued and screwed together with two 8-foot 2×4’s below to prevent it from flexing under weight. To support the removable tabletop, I purchased two collapsible sheet metal sawhorses. I screwed a 4-foot 2×4 onto the top of each one to provide a base of support as wide as the tabletop.
This arrangement gave me everything I needed: support for the stereo components I’d be shooting (ranging up to 80 pounds), a base to swap in and out different surfaces I’d be shooting on, a comfortable working height and something I could easily break down and store. And all for around $150.
Lighting
Shooting anything reflective is largely a game of creating, managing and minimizing reflections. Like solving any good puzzle, this can be accomplished in numerous ways that depend entirely on the nature of the product being photographed—its size, the material and finish of its surface and its level of reflectivity. If the product is a matte-finished cloth sneaker, you’ll need a different solution than that used for a chrome-finish toaster.
A good rule of thumb is that the more reflective the surface you’re shooting, the broader and more diffuse you’ll want the lighting to be. This is typically achieved using one or a combination of strobes and reflectors, softboxes, strip boxes, diffusion panels, velum diffusion sheets, fill boards and subtraction panels. The qualities and shapes of each of these will impact not only the lighting quality but also the shapes and intensity of the reflections created on the product’s surfaces. The product featured here had a brushed aluminum finish, making reflections significantly easier to work with than a more highly polished product.
There are numerous ways, from simple to complex, to light product images like the ones featured in this article, but there are a few commonalities among each. Essentially, the goal is to create a fairly evenly lit image with maximum detail and a flattering portrayal of the product.
Your setup can simply be one light above the product with white fill boards behind and side to side. Typically there are also one or two keylights on the right and left side of the camera position. This is the basic arrangement: light above, light left and right, light from the front. Each of these elements can be swapped and modified as needed. If the fill boards don’t yield the desired effect, substitute a softbox. If you need more contrast, a strobe with a reflector fired through one to three sheets of velum might do the trick, and so on. Sometimes a softbox on top, two side to side and one on either side of the camera is the ticket. Shooting with a black background requires fewer lights that a white background, which may need additional lights to separately control its illumination. There is no one-size-fits-all, but the concept is the same.
Shooting
Capturing accurate color in product photography is a critical element. It’s a good practice to always shoot an 18% gray card or color target that can be used later in post to create an accurate white balance.
For many products, deep focus across nearly the entire item may be required by the client. In these cases, a technique known as “focus stacking” can be employed. It’s much easier than it sounds and simply involves creating a series of exposures, each focusing on a different part of the product. These exposures are then composited together in post.
The focal length of the lens used also plays an important role. I chose a 100mm equivalent lens for its moderate compression and relative lack of distortion. Most images of consumer electronics are shot from slightly above the product. With these kinds of images, you’ll also want captures from a variety of angles. Shoot the front and back straight on to show the dials, buttons, inputs and outputs, and 3/4-angled shots of each side to illustrate fit and finish. Give clients a set of images shot on white and black, both matte and gloss, so they have plenty of options.
Post-Processing
The work you’ll do in post runs the gamut, and involves things like mirroring images to create/heighten reflections, compositing images, masking, creative computer graphic effects, burning and dodging, and lots of spot removal.
That’s a Wrap
I’ll revisit this topic in the coming months with more adventurous techniques as my skills set and assignments grow. In the meantime, this will give you a solid foundation to get started with. Keep in mind that you can apply these techniques to a variety products. If you’ve been wondering how to best photograph the albums you sell on your website, now you know.