
Ronin-M: The Disrupter with Joe Switzer
When you think of a technology disrupter, what comes to mind? Perhaps the smartphone eclipsing the cellphone, the iPod killing the Discman or DVD destroying VHS. All those products disrupted an existing product line. For decades, filmmakers have been using Steadicam vests and handheld gimbals to capture motion video shots, but there’s a big change coming. Welcome to the latest and greatest disrupter.
A few years ago, Freefly Systems introduced a revolutionary next-generation gimbal called the Movi. This $5,000 technology breakthrough was amazing, and now others have entered this marketplace. Things got interesting as pricing and weight of these new products were slashed by more than 50 percent. An overwhelming number of handheld stabilizers exist today, and the number of choices has accelerated, which makes it difficult for the average filmmaker to decide which handheld or three-axis gimbal to buy.
DJI’s Ronin-M might offer the best way for you to increase effectiveness and have the most beautiful motion video shots you’ve ever captured. Maybe you’re frustrated trying to get stable video shots or could never figure out the balance or tune your stabilizer correctly. Maybe you avoid trying to get gliding and motion video shots altogether. Capturing smooth-moving motion video has always been the biggest struggle, but it doesn’t have to be anymore.
Let’s look at the pros and cons of the DJI Ronin-M so you can see if this new product is for you.
The Bad
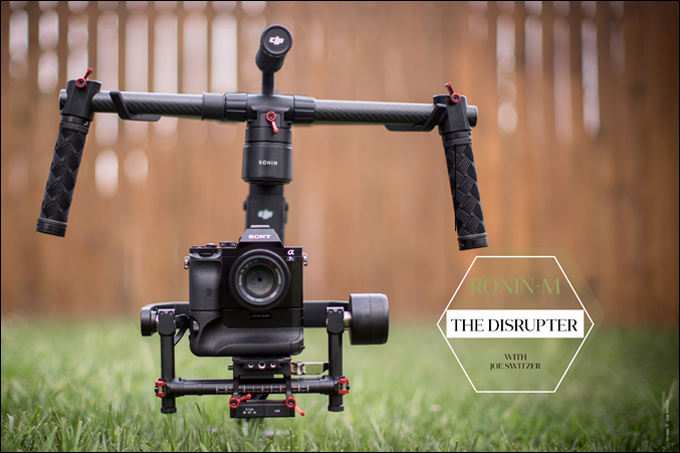
I’m not a hugely technical guy, and have a very short attention span. Reading manuals, assembling baby cribs and anything else that requires patience are not qualities that describe me. When you order your Ronin-M, it comes in a box with parts that you’ll need to assemble, including a remote. Assembly took me about an hour. I eventually had to find a video tutorial on YouTube that helped me see how to combine all the parts.
You’ll also need to balance the camera, which is more difficult than assembling it. When you do so, make sure you put the battery, card and lens on the camera. Take your time. Watch the YouTube tutorial and read the manual. You can’t just put a camera on the Ronin-M and start shooting, which may be annoying if you’re impatient. If you have trouble balancing a Glidecam, Merlin or Steadicam, then you are probably going to have trouble balancing this.
The last quality I don’t love about the Ronin-M is that I have to carry a stand with me so I can set it down on it when I’m not shooting. The stand is collapsible, but Ronin claims you’ll need to keep it on the stand when you’re not using it because of the fragile technology. Apparently the gimbal is sensitive, so you have to carry it around like a baby and keep it on the stand or just hold it. If you have a Glidecam, you can just throw it on the ground when you’re not using it, and throw it in a suitcase when you travel. So, you’ll be giving up a little durability.
The Good
The main reason to look at the Ronin-M is because it wears a lot of hats. It’s a tripod, monopod, track and Glidecam all in one. During the last 10 years, I’ve never seen such a disrupter like this. It’s least effective as a monopod or tripod, but shows its brilliance with the motion video shots that you normally capture with a track and Glidecam.
The challenge of using a track is getting a variety of video shots when you have limited time. A track can be placed on the ground or on tables quickly, but if you want specific heights, you’ll need to connect the tripod and change levels; it can take 10 minutes to set up a single shot, which is rarely worth the risk reward on a fast-paced shoot.
Holding the Ronin-M, you can get motion track shots from any angle you can physically get to by making the same side-to-side track motion. Low to the ground or over your head, the speed at which you can cover all the angles you want in a matter of minutes with perfect smoothness makes this video tool better than any track on the market.
For those longer gliding and moving shots, the Glidecam has long been the industry standard. Balanced correctly and using only one hand, the Glidecam was the only tool we used to capture motion for as long as I can remember. Our industry has had struggles with a Glidecam: It’s hard to keep it balanced, it puts heavy stress on your arm and it’s sensitive to the way you hold and walk with it. Maybe you can relate to coming home from a wedding day with a sore back, neck and arm.
The Ronin-M is easier to keep perfectly balanced, and is physically easier on you because you’re using two arms instead of one. You will still need to master the art of the walk and absorb bumps with your body. This takes time, and you will see the wider the lens you choose the easier it is. Sometimes we’ve had to stabilize motion video shots in post. Using the Ronin-M correctly saves time by giving you those perfect motion shots—without your track and Glidecam.
Finally, the Ronin-M gives you the ability to capture a variety of angles. It comes with a remote control with which you can pan and tilt while you’re in the middle of a shot.
Getting Started
So you bought a Ronin-M. Now what? Head straight to YouTube to watch “Ronin-M Full Setup Tutorial by Aerial Media Pros.” The video is about 20 minutes long, but it took me a few hours to set mine up. The video helps you see how to achieve perfect balance with your camera. Don’t let the setup and balance get the best of you. Have patience and take your time to set this up correctly, or your Ronin-M is worthless. Download the DJI Assistant App on your phone right away. It’s easy to fine-tune your calibration using the app, which is necessary for most shoots, especially if you plan on changing lenses. With the app, you can change the speed with which your camera reacts and moves. Try out different speeds until you find the movement you’re comfortable with.
We have used the Ronin-M on all of our corporate shoots for the past month. We’ve learned to use it efficiently. On some shots, we can team up and each hold a handle or even pass it off for longer crane-like shots. We found moments where we could add a pan or tilt, with one of us using the remote control to get an added effect while the other operator focuses on the movement of the shot.
We like that you can just turn on the Ronin-M and go for it, without any help. Or you can be fancy and operate as a team. It has changed our workflow and our ability to capture flawless motion video.
For the rest of the year, our Glidecam and tracks will stay in the car and make a great backup for when we hit a tech hiccup with the Ronin-M. We will continue to use a tripod for our time lapses, monopod for close-ups and the Ronin-M for just about everything else.
We’re always looking to do our job better, faster and simpler. This video tool lets us do that. In previous years, other brand-name gimbals have proved too heavy and complicated to rely on for our fast-paced shoots. If you have the money and want the newest technology disrupter, the Ronin-M is worth the risk and investment.


