
The Top 5 Ways to Prepare for Upgrading to Lightroom Classic v9 with Dustin Lucas
For wedding photographers using Lightroom, it is no secret that Adobe likes to launch new versions in the middle of our busiest season. What are we supposed to do—drop everything we’re working on and upgrade? Well, it’s not so simple for most users to jump to the next version, because things change. Upgrading can set back your post-production workflow, adding pain to your already-busy schedule of editing and meeting client delivery deadlines. So what is the answer? Wait until next year, or upgrade? To help you decide, let’s jump into the top five ways to prepare for upgrading to Lightroom Classic v9, so you can understand what you’ll gain and lose in comparison to the older versions. Upgrading from an entirely different version of the Lightroom app to Classic can be daunting, but it doesn’t have to be, as we will dive into the best and easiest ways to get you set up.
You’ll want to import your Develop Presets—not to worry, those will likely still work! For users transitioning from Lightroom 6/CC 2015 or earlier, though, you will experience the massive change with the Camera Calibration panel in Develop with Camera Process and Profiles. Lightroom has added quite a few new sliders and now lets you rearrange panels in Develop as well. We will also revisit Preferences and the new GPU Acceleration settings. Ready to get started?
1. Upgrading From Older Versions
For Mac and PC users, there are different challenges with installing software tied to your Operating System. I will focus on using Mac OSX 10.14.6 and how to prepare for upgrading from Lightroom CC 2015.14 (or Lightroom 6, for those of you with a standalone version). Now, many users have been upset about the transition to a subscription-based pricing structure, but I gotta be honest and say just get Adobe Creative Cloud, Photographer Plan. Stop converting new camera RAW files to DNGs so you can work in an older version—that is just backward, in my opinion. And here’s a tip: when you upgrade Lightroom, duplicate the old version first so you can keep previous versions.
Open up Finder and go to Applications to find the Adobe Lightroom app. Then, right click the app file and choose Duplicate to create an actual copy. This is not an alias or shortcut; you’ve created a completely separate app and can open both Lightroom apps at the same time. That means you can run two different catalogs simultaneously—pretty cool! You might be wondering why this is important to do before upgrading to Lightroom Classic. It’s necessary because, in the event that during the installation process you do not get an option to keep older versions, this will serve as a backup. I found this out the hard way going from Lightroom Classic v8.4.1 to v9.0. All the catalogs I created in v8.4.1 had to be upgraded, causing a huge mess, as I share hundreds of catalogs a week with clients. Many users will just upgrade the catalog and be done with it, but this is an important step so you can keep an archive of catalogs in previous versions.
Once you’ve upgraded to Lightroom Classic v9, you will notice a lot of changes. Let’s get started in navigating them. We’ll begin by importing all your Develop Presets.
2. Importing Develop Presets
Now, whether you’ve built presets or bought third-party ones, you will want to know things like what Process Version, Profile, and Develop Sliders are being applied, and so forth. If you are transitioning from an older version of Lightroom than v8, you will need to convert files from the .lrtemplate format to the .xmp format. Not to worry, as Lightroom will perform this conversion for you—there are just a few steps to doing it.
Open a Lightroom catalog, go to the Develop module, drop down the Presets panel on the left, and right click on one of them. Then, you need to click the option Show in Finder in order to access the preset files in the user Library.You can now copy all the Preset Groups if you’ve made custom ones, or just copy the User Preset folder to paste in a folder on your desktop. I do this so I don’t have to mess with those files when importing, as sometimes they’ll disappear on me during the process. This is a simple but effective trick to save backups of your presets as well.
Now, we will need to open the new Lightroom Classic v9 catalog to get started on import and converting presets. Go back into Finder and navigate to the backup folder of presets on your desktop. Start by selecting one of the .lrtemplate files, and drag and drop it into the Lightroom Classic icon in your Apple Dock. This quite literally means select the file, click and drag it to the icon in the dock, and release. If you do this right, you will get a popup on screen confirming you want to Install Template. Typically, the installed preset will be ready to use in the Develop module and will show up already at this point. If it doesn’t, you will need to close Lightroom Classic and relaunch it. To verify the preset was installed and converted, you will get a popup that says, “preset successfully converted into .xmp.”
There are alternatives, like exporting presets individually; however, this can take a while with multiple presets. I like to make things as easy as possible, and knowing how to navigate my user Library, I like to use a different trick. In Library, you can copy the folder of presets from Lightroom>Develop Presets and paste them into Camera Raw>Settings. Then, open Lightroom Classic and you will find your presets already installed. Make your life easier by copying and pasting!
We are now ready to see what has changed with Camera Calibration Process & Profiles.
3. Process & Profiles
The first thing you’ll notice at the top of the Basic Panel underneath Treatment is the Profile Browser. It makes absolute sense to have this accessible at the top now instead of buried in the Camera Calibration panel at the bottom. When it comes to editing, you always apply Profile first before editing color and tone settings. With the Profile Browser, you have a simple way to preview the profiles and manage them. This is a massive overhaul feature you get in Lightroom Classic, one that makes it worth transitioning. Installing these is as easy as it was for Develop Presets. Find all of the .dcp files in Finder, then copy and paste them into CameraRaw>Camera Profiles. If you installed them in a previous version of Lightroom, you should be all set.
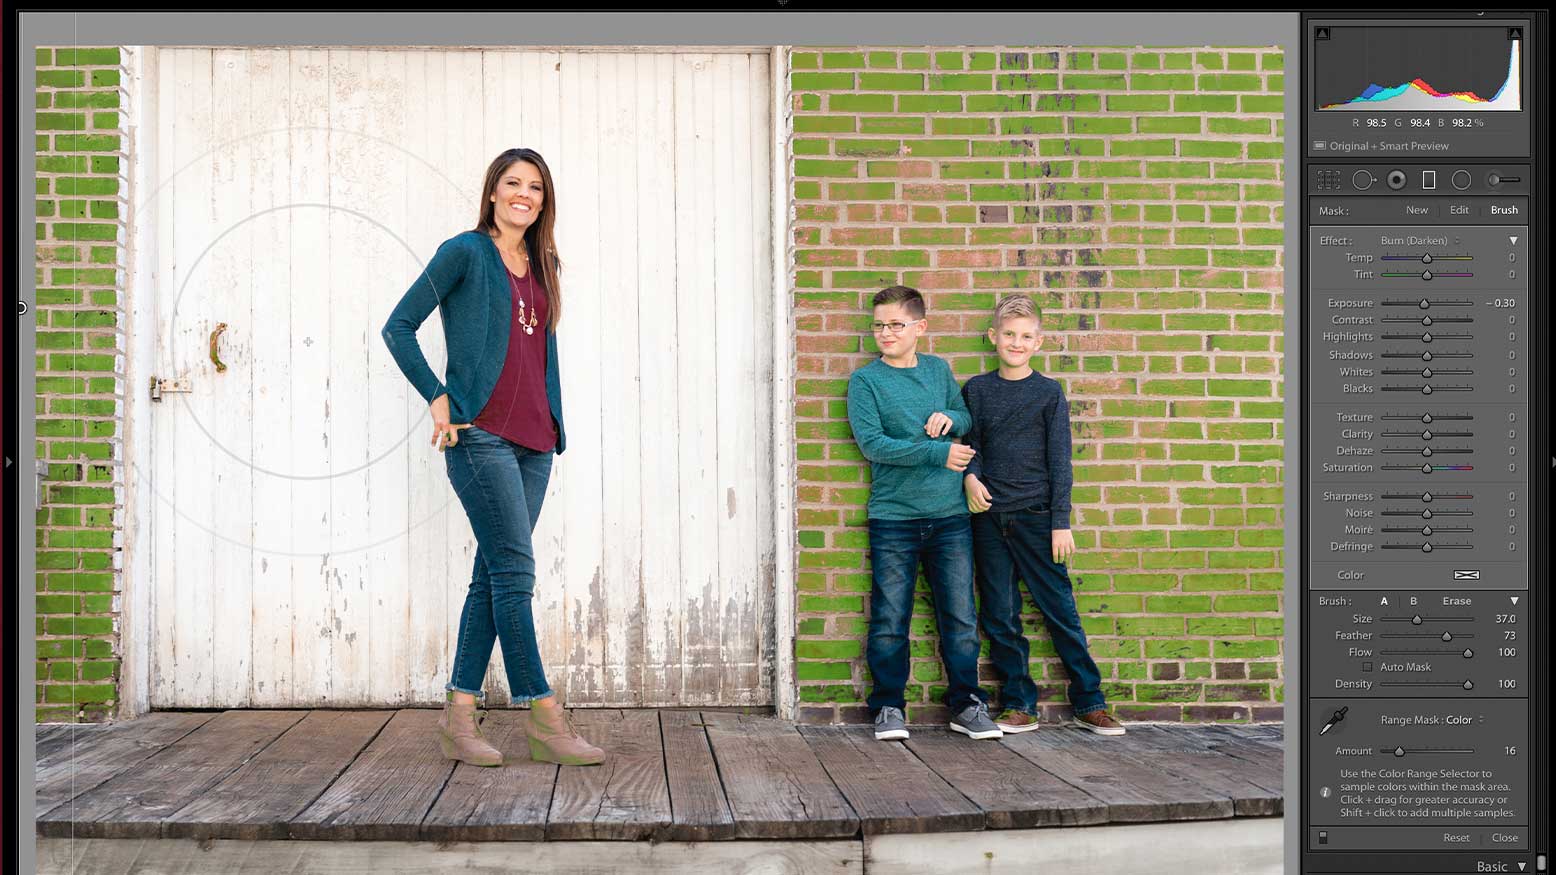
The Calibration panel is located at the bottom still; however, you can customize these panels to remove or rearrange them. This is really convenient in order to be able to finally customize your Lightroom Develop panels to align with your specific editing process. Process Versions 1 & 2 emulate the older 2010 version. This gave you sliders like Recovery, Fill Light and Brightness, which all had their place prior to 2012 launching. This started with Version 3, and you can take full advantage of Lightroom Classic remaining in the current Version 5. I recommend this version so that you can have the opportunity to use Range Masking for the local adjustment brushes.
Let’s look at the additional editing sliders added to Develop as well.
4. New Develop Features
In the Basic Panel, the Presence section got quite an overhaul, adding Texture and Dehaze to the group. Texture is a really interesting slider, as it applies a similar effect like Photoshop has for High Pass sharpening. It really grabs the edges of the subject, allowing you to only affect sharpness, while the Clarity slider adds a mid-tone adjustment. Also, its ability to soften the skin is so much better than that of Clarity. This has been added to the adjustment brush as well, so you can mask it on the skin only. This is a game-changer in terms of touching up skin in Lightroom.
Dehaze has moved from the Effects panel to offer an alternative to the contrast slider. This is used to adjust toning in the shadows and blacks. You can think of it as a dark-tone contrast slider, as it does not adjust highlights or whites. When using it, you have to be careful to not turn the skin too orange.
One of the more useful tools is the Range Masking feature. Using local adjustments, you can paint on an effect, select Color or Luminance, and specify where you’d like the effect to apply. This works really well for color such as skin tones, blue skies, green grass, white dresses, etc. You can use this with the adjustment brush, as well as with graduated and radial filters.
Custom profiles have really helped step up my creative workflow as well. This feature lets you non-destructively apply toning effects to your images without any of your sliders being adjusted. That is pretty awesome for Lightroom users. To read more on this, you can check out my May 2019 Shutter Mag article, “Photoshop to Lightroom: How to Turn Custom LUTs Into Color Profiles.”
Let’s wrap up with Lightroom Preferences & the new GPU Acceleration options.
5. Performance Preferences & GPU Acceleration
For my Mac workstation and editing workflow, I am still building Smart Previews at import and staying connected to my RAW files. This lets me fly through editing while having the ability to zoom in to 1:1 with more advanced tools. At the end of the day, you want the ability to work fast with the accuracy needed with RAW files. Here are my preferences to use as a guideline for working this way.
Open Lightroom Preferences from the File menu-bar at the top, or hold command while striking the comma key. You will want to choose the Performance tab and check the box “Use Smart Previews instead of Originals for image editing.” It is very important to choose this option so you can experience the performance of Smart Previews. Also, I like to set the Camera Raw Cache Settings to 100.0 GB and the Graphics Processor to Off for the moment. Then, I will go to Catalog Settings to customize the Standard Preview Size and Quality. Typically, I set both to the lowest settings to reduce time spent with Lightroom constantly updating Standard Previews. Keep in mind, this task is running all the time and may be the cause of your catalog running slower.
Let’s jump into the GPU Acceleration and the enhancements Adobe has made for users wanting to take advantage of their GPU. The biggest increase in performance I am getting is with local adjustments like the Adjustment brush, and Graduated and Radial filters. When I toggle the Use Graphics Processor setting to Custom from Off, the brush applies the effect slightly more smoothly, but not enough to keep this turned on. Cycling through images in Develop is still better with the Off setting applied. Better luck in the future, Adobe—we are still waiting!
The Results
Now you are fully equipped to upgrade with confidence, and for wedding photographers, you can breathe easy as you made it through the busy season. Again, prepare for the nuances before upgrading to Lightroom Classic V9 so it’s an easier transition. If you are coming from Lightroom 5 or 6, you have a lot to look forward to. At least you can stop converting your RAW files to DNG, which is a huge waste of time. Don’t be afraid to import your old presets and profiles; use my copy-and-paste method in Finder to make it simple. There are many new features and sliders for editing, as well as new ways to process your files, and I implore you to try them out!
I think it is safe, for a majority of users, to turn off the Graphics Processor users, and try my preference settings. Stay tuned for more articles on Lightroom this year, and always remember: work smarter, not harder.


