
Travel Light With Lightroom CC with Dustin Lucas
When it comes to traveling and personal photography, I like to edit and share my images on the fly. This means I’m not waiting to connect to my RAID storage drive at home before I can get started on my images. I want to quickly ingest memory cards, save Raw files to a fast external drive, and add my photos to Lightroom. Lightroom Classic is typically my go-to for photo gigs, however, in this case I want to be mobile and share edits fast. This is when I use Lightroom CC. I can truly travel light for post-production and have the ability to edit from my phone.
Many creatives are sensitive to color and want to control output by always working in a calibrated environment. I get the resistance to editing on a tablet or a phone, but with mobile platforms, sometimes convenience is better than control. I always preface using any piece of software with understanding the limitations of its function. With Lightroom CC, I can take an image with my phone or mirrorless camera and edit with professional software seamlessly.
This app is really simple to use and I recommend setting it up on your laptop first to set up preferences and workflow. I will cover the difference between the desktop and mobile versions so you can make smart decisions when using it. Lightroom is faster than ever with its ability to add/import photos directly into the app. Did I mention you can fully edit in Lightroom CC? Many of the same tools from Classic are available. Once your images are ready for the light of day, you can share them instantly on your mobile app.
Set Up Your App
I understand the backlash from the Adobe subscription controversy, so if you’re against this model, then this article isn’t for you. You have to purchase a plan from Adobe to get access to this app, which includes cloud storage. It makes perfect sense as you will have to store images in the cloud to access them between desktop and mobile devices. Check out the best plan for you at https://www.adobe.com/creativecloud/plans. Before we get started adding photos, you’ll want to install the app and set your preferences.
Preferences are simple to set and the options are minimal. You have Account, Local Storage, General, Performance, and Interface. Out of all the default settings, I only change a few regarding local storage and performance. In Local Storage, I set photo cache to 10%. In Performance, I turn off graphics processor as a habit from Lightroom Classic. Since the majority of my images will be accessed in the cloud between desktop and mobile apps, local storage beyond my external is not necessary. Let’s compare Lightroom CC desktop and mobile versions and get the workflow dialed in.
Not to confuse you with Lightroom Classic, this desktop version of the Lightroom CC app is fully online and synced with the mobile version. This is all done by storing files in cloud storage. Now you have a fully-synced system in Lightroom, whereas before you would have a single catalog on your computer not connected to other places. Lightroom CC is not a catalog-based system because it’s synced across the cloud. Beyond syncing metadata between multiple devices, it’s easy to sync files to your social media platforms. Lightroom CC on a mobile device allows you to do this, but the desktop version can’t. All your presets, profiles, and other develop settings quickly sync between apps without a problem.
You can sync images from your Lightroom Classic catalog as well. The only caveat is you have to dedicate 1 catalog to syncing. Once you connect the catalog to the cloud, the sync app automatically adds images from the cloud to your catalog. Choosing images from your catalog is a 2-step process and quite simple. Add images to a Collection and click to the sync checkbox located to the left of Collection. This is a quick way to start adding images to the cloud manually since the catalog is technically offline. Now that we’re set up to work in Lightroom CC, let’s add some new images and get started.
Add and Organize Images
Lightroom has always been criticized for its inability to browse images instantly. Selecting images to import can be a pain to some, but Adobe requires this because your images are being synced to the cloud. You would have storage issues if all images were added automatically. Once you open the app you can quickly click the “+” button in the upper left corner to add photos. Then, you can choose to add them to an already existing album to quickly start organizing your images. This is a simple way to start. Keep in mind images are automatically sorted into date folders for additional organization.
You can also create folders and albums later if you decide to rearrange images. Folders can contain multiple albums. This becomes really helpful as your library grows with more and more images. Another really useful way to bring images into Lightroom CC is the Migrate from a Catalog feature. This allows you to migrate a catalog into the app. This can be a really useful way to bring in older work into Lightroom CC. Keep in mind there are a few limitations when performing this feature. You can only migrate a catalog one time. Also, catalogs connected only to smart previews will not migrate into Lightroom CC. You must connect the originals to the catalog before migrating resolution. This becomes important when zooming in on an image and exporting for print. For sharing on social media, we will have no issues with smart previews.
Now that we have our images added to Lightroom CC, let’s cull and edit our favorites.
Edit Images
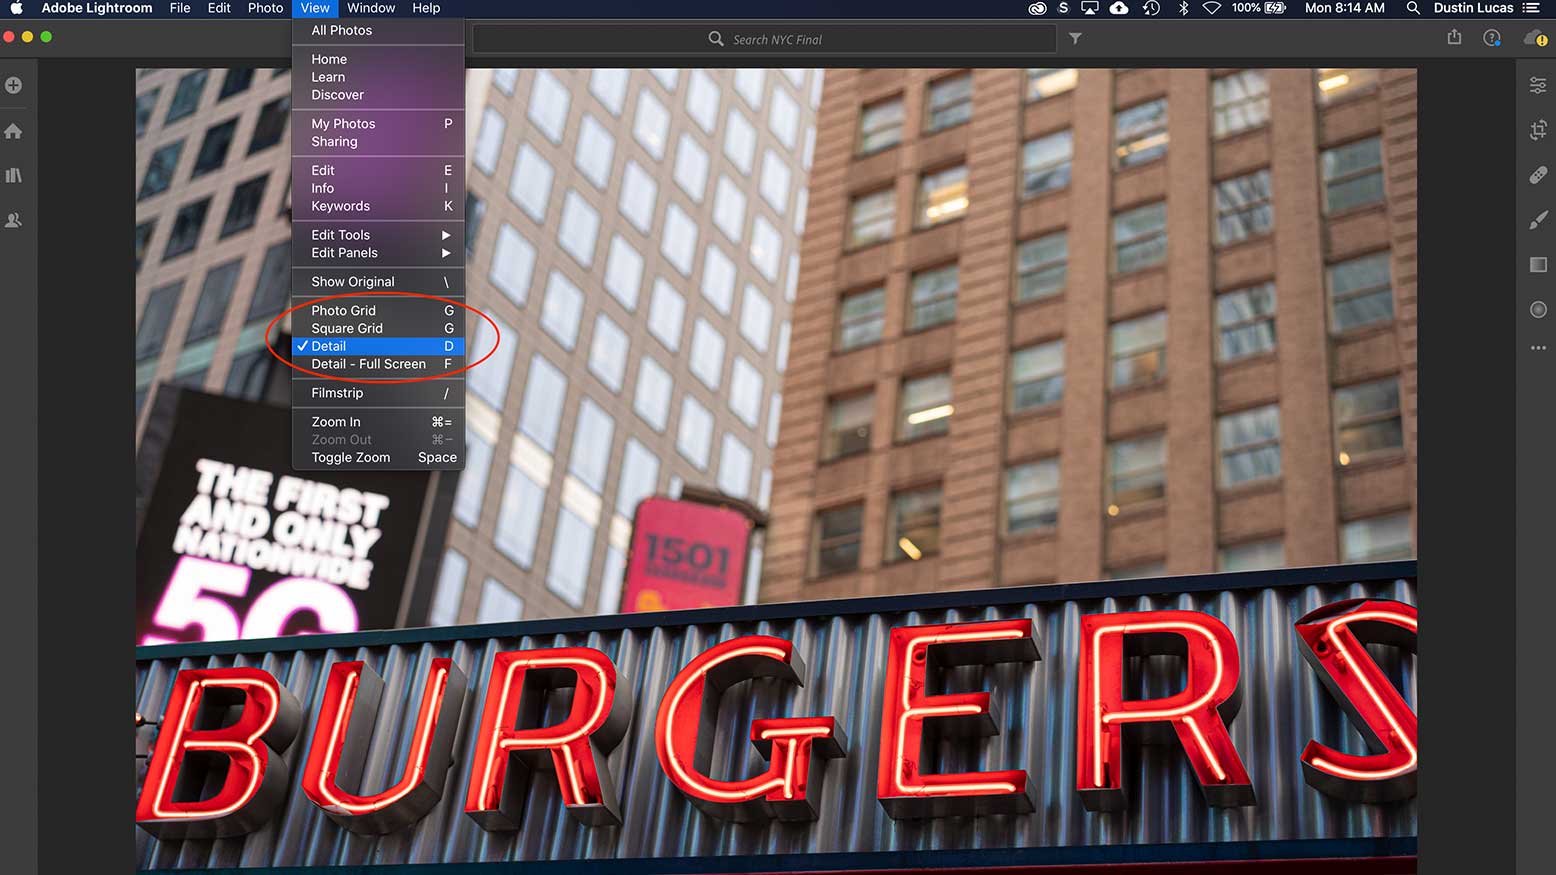
Culling is simple to do in My Photos, which is similar to Library or grid mode. Strike the “g” key to jump into My Photos. Double-click the first photo in an album to enter detail mode and start culling your images. You can use star ratings quite simply by using keys 1-5. If you prefer flags, strike the “z” key to pick an image, use “x” for rejected, and “u” for unflag. There is also the ability to add keywords, image data, and change capture time. Let’s move into Edit mode to apply some adjustments.
I really appreciate the layout of the Edit module because you finally have the correct order of operations when it comes to color correcting. Start with applying my preset including the Profile, then move to Light for brightness and recovery, Color adjustments, Effects for tonality and creatives, Detail for sharpening and noise reduction, and Optics for lens correction. Geometry is basically Transform like in Lightroom Classic. This app also has target adjustment tools as well to make things even easier when you need to adjust a specific color or tone.
Other useful tools migrated to Lightroom CC include spot removal, adjustment brush, and linear and radial gradient tools. Cropping and straightening can be activated by striking the “c” key, although I can’t seem to cycle between images in this mode. That makes using crop really slow for me since I have to exit the tool, click the right arrow to advance images, and then click “c.” They have brought over copy settings and sync to make editing faster of course.
A few extra tips would be to hold down shift while double-clicking many of the editing tools to auto-apply just that one. I like this for blacks, whites, and tint to help get me good density and help with color casts. Also, I usually show the histogram and strike the “j” key to show clipping. You’ll want to check for dust spots on your image sensor. I use the healing brush and turn on visualize spots. This makes it really easy to spot dust and remove. No one wants sensor dust on a final image. Once your edits are dialed in, let’s export and share them immediately.
Export and Share
I find that exporting is best on a desktop while sharing has to be done on the mobile app. On the desktop app, you can choose to export the images the same way you can from Lightroom Classic with the exception that you can’t apply droplets. You can also share a link with your client to view, comment, and download. Albums can be shared and you can invite people to access them quite simply. There are additional settings to share the link to Facebook or Twitter, custom name album and author, adjust the theme/layout, allow comments/likes as well as choose ability for people to download. Sharing can be turned off if you want to pull the gallery offline. Once you share the album you can access the link and view your gallery in a browser.
Sharing on the mobile app allows you to directly post to Facebook and Instagram which makes getting my images on social media so much faster than before. The mobile app cuts out so much busy work to get images posted on your social platform. For Facebook, you choose between News Feed and Your Story. Instagram is much simpler as you can punch in your captions and hashtags right away.
The Results
Lightroom CC simply lets you edit and post images on the fly. Traveling light is important because you aren’t going to lug around more gear to be able to ingest files from your memory card. In fact, you could hook up your camera, import files directly to the cloud, and bypass having to use an external drive. I use a 500GB SSD USB 3 drive so I can pull hundreds of files off the memory card in a flash. Doesn’t hurt to have a backup on the road! Once I add and organize my photos, I’m ready to edit. Editing in Lightroom CC on an iPad is effortless, especially with an iPad Pro. Once I’m ready to export and share, my phone syncs automatically with the app to get the up-to-date version ready for Facebook and Instagram. Boom, now I’m ready for my next trip!


