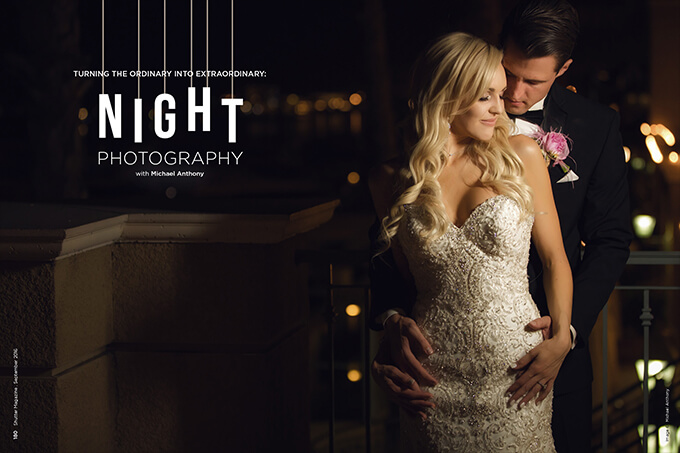
Turning the Ordinary Into Extraordinary: Night Photography with Michael Anthony
Want more information on this article? Get access to video content and additional supporting images. Launch the September issue of the magazine by logging in or signing up for a free account by clicking here. Shutter Magazine is the industry’s leading professional photography magazine.
I open most of my articles for Shutter Magazine by reminding readers that wedding photography is the most difficult genre to shoot. You are expected to know how to be a portrait, product, event and fashion photographer all rolled into one, not to mention a counselor, psychiatrist and coordinator.
In addition, your clients expect you to be able to do this under what is often the worst set of lighting circumstances possible, with minimal equipment. It’s no wonder I’ve heard prominent portrait photographers say they would rather stick needles in their eyes than become a wedding photographer. Nonetheless, if it is in your blood, as it is mine, you can’t see yourself doing any other type of work.
When we get late into a wedding day, we often face terrible lighting for the reception, and lighting an indoor event is a whole different challenge than dealing with harsh light throughout the day. That can be your opportunity to stand out. One of the ways we do that is to take our couple out right before we leave for a night portrait.
Doing a small session at night with your couple accomplishes a few things. First, it gives the couple a much-needed break from the commotion of the reception. It also gives you the opportunity to create more dazzling work for their walls. It gives you a minute before you leave to verify with the couple that you got every picture they want. Most importantly, it gives me the ability to close out their wedding album with an amazing photo and end the night with an incredible experience.
Plan Out Your Time
The first step in making sure you are able to create these images for your couples is to plan the timeline. Nobody has learned the importance of properly planning a timeline better than me in the past year—not doing so last year almost caused chaos with our 100-plus wedding schedule.
You don’t want to be fighting coordinators for 15 minutes of portrait time with your clients. Talk to them early and remind them of their investment in remarkable imagery with you. Since this usually takes place at the end of the night, it is imperative that you plan out your timeline so your night session doesn’t interfere with the cake cutting, bouquet/garter toss, etc.
Plan your timeline before the coordinator does, and make sure the coordinator has the timeline before their first meeting with the couple. It’s best to have a phone conversation with the coordinator so they don’t feel like you are infringing on their responsibilities.
Get Comfortable With Lighting and Gear
If you’ve read my articles, you know I am a big proponent of creative light. In order to do this correctly, you will need a variety of tools. While you can use natural light even at nighttime, which I will show you later in this article, you cannot rely on it as a keylight source because you don’t know where it will be available. Here are some of the tools I recommend having on the wedding day.
Video Lights
Icelight or Yongnuo Light Wand
I have invested in multiple Ice Lights, an incredible tool. I love that they can be modified with barn doors to create beautiful images. The Ice Light is sold as a portable window because it creates softer light than a traditional video light. I recently picked up the Yongnuo Light Wand. I usually stay away from Yongnuo reverse-engineered products because of their terrible build quality. The Light Wand, however, is not reverse-engineered, and has features that are completely unique to it. I have found the build quality to be acceptable and, for $75, you can buy six of them for the price of a single Ice Light.
Rotolight NEO
I bought the Rotolight NEO, my newest tool, for our video work. I fell in love with these lights right away because they offer adjustable color temperature without the need for attachments. The light quality is more specular, creating shine on oily faces, which you get after a long night of dancing. In a wider shot, this isn’t noticeable. The lights are AA-battery powered, so you will be able to quickly change out a set.
Flash Systems: Speedlights
We are Canon shooters, and have been using the 600EX-RT system since its inception a long time ago. If you are shooting Nikon, Sony or another system, I have heard good things about the Phottix Mitros system. It’s important to use a radio system rather than the optical slaves built into your flash, which can cause havoc during a reception because of all the lights used by the DJ and guests’ cameras. We modify these lights with the MagMod system as well as the Westcott Duo Rapid Box.
Find Your Background
Think of shooting at night the same way as shooting in the studio. You are essentially creating the entire scene yourself. Find locations with ambient lighting. Maybe you can incorporate a building into your image that has ambient light coming from windows or porch lights. Light a fountain with a speedlight or video light. The trick here is to create some dynamic lighting so that you are able show off the scene—otherwise, you may as well have photographed the couple in a closet. If there is no other background available, buy a $10 set of string lights on Amazon to shoot through.
Light Your Couple
When lighting your couple at nighttime, the contrast and shadows will be very prominent because of the lack of ambient light. It is important to use a modifier if you can to soften the shadows—otherwise, the harsh light on your couple will be unflattering. Also, because the subject will fade into darkness, I always use a backlight on our couple to separate them from the background. I often use only a backlight if I cannot find any ambient light to use as a background. A simple backlit shot is very easy to use as the final spread in an album. Just make sure you shoot a variety of vertical and horizontal images so you have a variety to choose from.
Long Exposures
You can make a dynamic image with a long exposure. While it’s not always my cup of tea, it can be helpful when shooting at night to have ambient light available. These techniques take a long time to master, and you will not nail it if you do it for the first time at a wedding. When shooting a long exposure, your couple has to remain still, so I recommend having them sit down and embrace in order to keep them from moving while you take your shot. Limit the shutter to less than 1.5 seconds to avoid motion blur, and then you can use techniques like light painting to get a great final shot. In addition, you can shoot two images and create a composite if you have a tripod and a few extra minutes with your couple. Remember, flash will freeze motion, so use that to your advantage if you want a shot of the couple standing up.
Putting It All Together
When you do this consistently, you are able to sell it as another unique service to your clients. They likely won’t see many similar examples in your competitors’ portfolios.
Remember, the law of supply and demand dictates that originality is concurrent with a higher price point. In a landscape of ever-improving competition, you have to look to the things that will make your work stand out. Post-production, lighting and your creative landscape all make you stand out from the crowd. Keep sharpening your skills so you are never left in the dust.