
5 Tips for Faster Creative Editing From Photoshop to Lightroom with Dustin Lucas
The difference between spending hours in Photoshop on a single image versus working with multiple images at a time for just a few minutes in Lightroom can be frustrating, to say the least. Avoiding this massive loss of time requires knowledge of the limitations of Lightroom and what you want to do to an image. If an image needs heavy composite work to swap a sky or clip out a subject, of course it’s Photoshop to the rescue. But what about the creative editing of tones, color grades, dodge and burn, HDR, sharpening, etc.? Can we really work in Photoshop to prep and go back into Lightroom and get good results?
I know this sounds insane for anyone with a Wacom tablet who swears by the countless hours of perfecting masks with pressure sensitivity—trust me, I get easily annoyed by the fact that you have to rely on clicking a mouse in Lightroom. Remove that mindset from your editing workflow. We need fast results that are precise enough to show off to the client. Once they are sold on a print, we can get back to perfecting the image for printing. Think about what you do to a creative edit and how Lightroom can replace these tasks quickly.
Color Profiles should be where you start every edit so you can quickly push the boundaries of your creativity. After you find the right style, fine-tune it with Target Adjustments Tools. Once you are happy with color, we can burn down the background and make your subject pop. This is a crucial part of editing that gets the viewer stuck on the subject. Then it’s all about attention to details, from intensifying the sky to sharpening your subject, which makes all the difference in a good image versus a great one.
Let’s jump into Color Profiles and apply the right style to this image.
Creative Toning First: Use Color Profiles
In previous articles, I touched on how to export LUTs from Photoshop and create a Color Profile to use in Lightroom. This has dramatically changed my workflow for applying toning to multiple images at once with a click of a mouse. No more batch processing in Photoshop to see if I even like the results. After applying the profile I want, I dial back this effect with an Amount slider at the top of the Basic Panel. Notice how this is completely different from a preset in that the adjustment sliders don’t move. Also, keep in mind you can apply only one profile to an image.
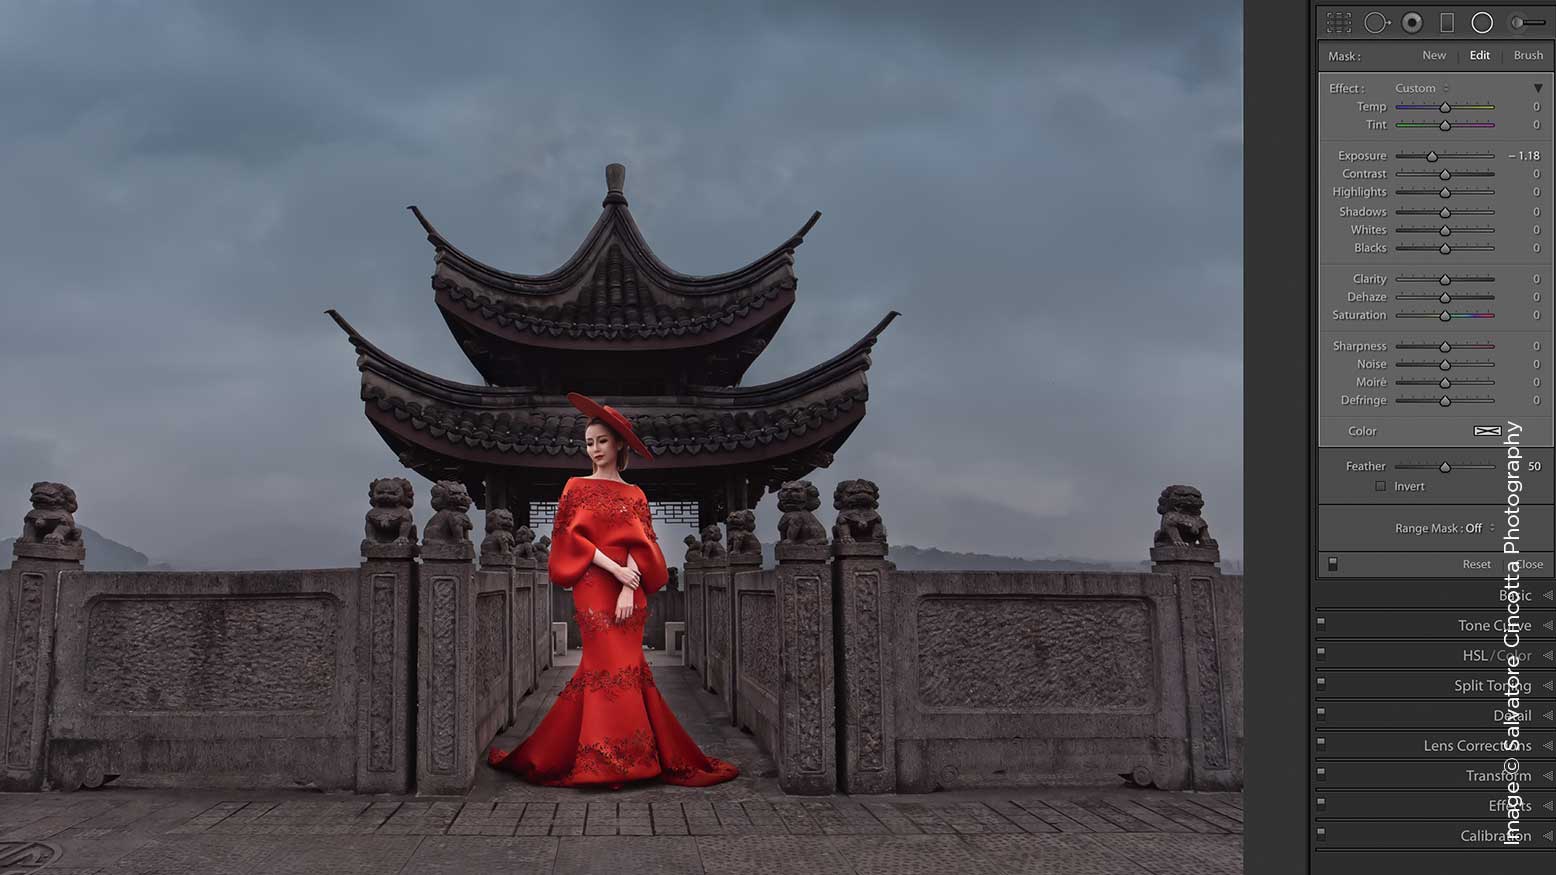
For most creative edits, I like to pull down saturation, shift the entire image with a nice color grade and flatten the tonal range. This sets me up for less work in terms of burning down the background, and I can quickly bring back the whites/highlights to help make the subject pop. With that in mind, I already am seeing issues with her dress getting lost and the bright sky taking most of my attention. It always helps to close your eyes, open them and notice that your eye always goes to the brightest part of an image. If that’s not where you want the viewer’s eye looking, we have to burn it down.
Targeting areas to adjust for these distractions is our next step.
Fine-Tune Color/Tones: Target Adjustment Tools
Target Adjustment Tools make editing faster while letting Lightroom control what precise parts of an image are affected. Hold Shift, Option and Command while striking the “H”, “S”, “L” or “T” key. The HSL panel controls specific colors, while Tone Curve is all about enhancing tonal range. If I want the dress to pop, I start by holding Shift, Option and Command and striking the “S” key. Then click on the dress and drag the cursor upward. Instantly you see the red and orange sliders moving to the right. Next, if we want to brighten the dress, we can do the same thing by striking the “L” key. That took less than 10 seconds to dial in.
Moving on to the sky, we want to bring back some blues and darken it. We can drag the saturation upward and the luminance downward. It’s really that simple and can be synced to multiple images in the same sequence. For the tonal adjustments, we activate the Tone Curve target adjustment tool by holding Shift, Option and Command and striking the “T” key. Since the Color Profile controls the tonal density, tweak the dark tones to be less flat simply by clicking in the shadows of the structure and dragging downward.
As we work through the image, you’ll notice the effect of the color profile seems to disappear. Not to worry: We increase the Amount slider to bring back the color-graded effect. Now we want to make the subject pop even more by using the Radial Filter inverted.
Make Your Subject Pop: Radial Filter Inverted
The quickest way to burn down the background in Lightroom is to invert the Radial Filter, draw an oval over the subject and drop exposure. It doesn’t stop there because you will have a massive halo around your subject that looks almost as bad as an out-of-focus image. Since this did most of the heavy lifting, we need to limit the range of the mask with either color or luminance. With a deep red dress and her lighter complexion, I would choose Range Mask: Color. Then grab the selector tool, hold Shift and click in the sky and the structure behind.
To perfect this mask, we will add/remove areas with a brush. Only the colors included in our selected areas will be added when painting with a brush. If you need to widen the range, drag the range mask Amount slider to the right or add the selected area with the dropper tool. Next, erase the mask from the skin tones and where the mask is on the subject. If you want to apply different adjustments on a new pin, duplicate the pin. This is likely the most time-intensive part, but these three steps help save time.
Other useful options for dodging the client are using the Adjustment Brush with Auto Mask to keep the hard edges of the dress and paint in highlights on the dress. To separate adjustments from the subject, architecture and sky, use the Graduated Filter.
Intensify Your Sky: Graduated Filter
Striking the “M” key opens the Graduated Filter, allowing you to click and drag downward so the mask applies to the top horizon line. Everything above the filter is automatically added and the gradient is determined by how far you spread the bottom bar. To adjust the bottom bar only, hold the Command key while dragging it down. Then we can quickly mask out everything but the sky with the color range mask. Using the selector tool and clicking in the sky was helped by the fact that we added some blue tones earlier. Now we can start to add effects to add intensity to the soft sky.
After adding contrast, the sky starts to get too blue for my liking. This is easily fixed by lowering saturation. For a more HDR effect, I add clarity to start adding intensity to the softness. The same process can be done for the architecture as we add a new filter and drag upward. Then we can use the color range mask to remove the sky and subject. If some areas overlap, lower the Amount slider. Now our image is ready for some detail work.
Attention to Details: Masked Sharpening and Noise Reduction
We can attack this last step multiple ways with masking tools to precisely dial in our sharpening and noise-reduction adjustments. Start in the Details panel and zoom into your image to 1:1. Lift the Amount slider under Sharpening to bring out the details in our background. This sharpens her face too much, even after lifting the Masking tool. A fix would be to go into the Adjustment Brush, paint over her face and lift Noise to soften this sharpening.
If we focus on her face for a moment to try to even out the lighting, we can enhance this image. Notice that if we try to lower the sharpening slider, her face goes out of focus. Instead, we can use the skin softening technique of lowering contrast, highlights, clarity and dehaze subtly. Then we add back in any sharpness to fix overly soft skin tones. This image is starting to look client-ready, something I’d be happy to put in front of them to preview.
The Results
At the end of the day, it’s all about the results, learning new techniques and knowing where to invest your time. Lightroom has some impressive tools, and if it can save me hours of processing dozens of images to this level, I will do what I can to stay out of Photoshop. My goal is to not slap on a preset or profile and call it a day. This edit took real time to mask in the right look and feel. Knowing how to use Lightroom and its limitations, I can edit creatives efficiently. That’s the key to editing faster and better.
Try out these tips on your next edit, and tell me what you’d rather spend your time doing: spending all day perfecting an image or editing in a fraction of the time. Your clients will appreciate their preview session sooner and likely won’t bat an eye at the difference.


