
7-Part Series to Step up Your Lightroom Game: Part 5 Creative Editing with Dustin Lucas
Now that we’ve finished correcting color and exposure, it’s time to get creative and show off our best work. When it comes to creative editing in Lightroom, there is a lot we can do without having to jump into Photoshop. That’s exactly what I want to cover in this article, while also offering workflows for Lightroom to Photoshop for that extra level of editing. Obviously if you want to do a composite, swap a sky, or move people around, you have to leave Lightroom. This is why it’s important to know how to work in other programs while keeping files organized in your catalog. The last thing you want is to hunt down edits done outside Lightroom.
I want to start with Lightroom’s local adjustments, including the brushes and filters to show off the editing power of this program. It’s a perfect way to brush on skin-smoothing effects as well as an efficient way to dodge and burn. You can build a custom profile in Adobe Camera Raw and load it in Lightroom to offer a complete, non-destructive option for creative edits. This is a really awesome upgrade! Going from Lightroom to Photoshop files should be an organized process, and I will show you how with the Edit in Photoshop feature. This is a game-changer for my post-Lightroom workflow.
Let’s dive into brushwork in Lightroom to get started.
Local Adjustments With Brushes & Filters
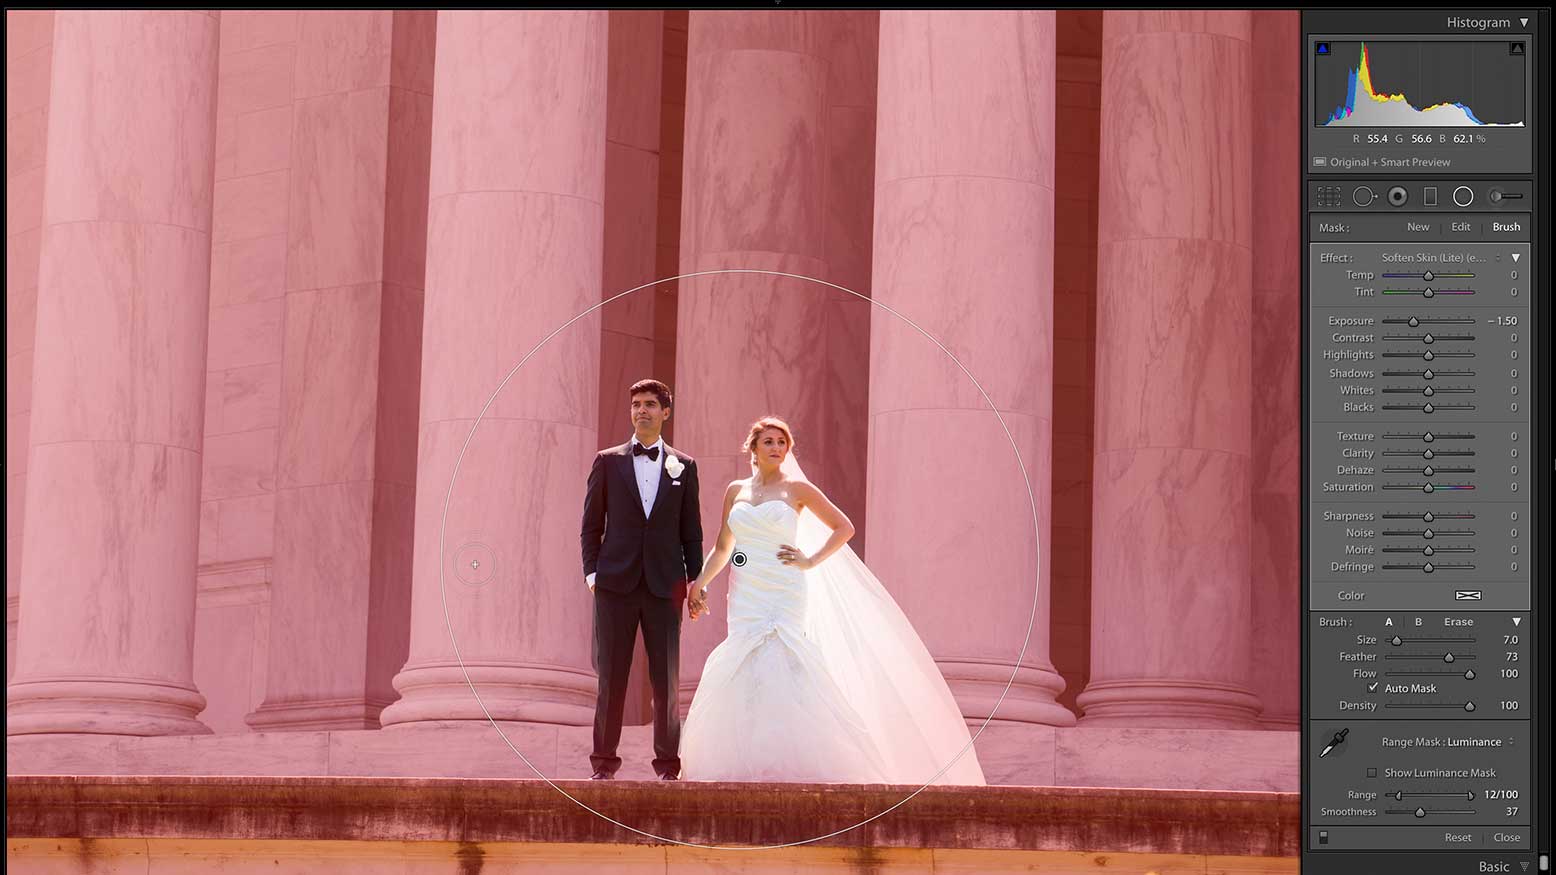
When it comes to local adjustments, my first instinct is to burn down the background and make the subject pop. The quickest way to burn down the background in Lightroom is to invert the Radial Filter, draw an oval over the subject, and drop exposure. It doesn’t stop there, because you will have a massive halo around your subject, which looks almost as bad as an out-of-focus image. Since this did most of the heavy lifting, we need to limit the range of the mask by either color or luminance. With the bright dress and her lighter complexion, I would choose Range Mask: Luminance. Then grab the selector tool, hold shift, and click the structure behind. This doesn’t really help isolate the couple from the background.
To perfect this mask, we will have to add/remove areas with a brush. Keep in mind that only the colors included in our selected luminance range will be added when painting with a brush. If we need to widen the range, we can quickly turn Range Mask off. Next, you will want to erase the mask off skin tones and wherever the mask is on the subject. To do this, you can choose a brush at the top of the panel, hold option, and be sure to turn off auto mask when applying. If you want to apply different adjustments on a new pin, you can also duplicate the pin. This is likely the most time-intensive part, but following these three steps helps cut time down.
Other useful options for dodging the client are using the adjustment brush with auto mask to keep the hard edges of the dress and paint in highlights. To separate adjustments from the subject and background, I recommend the Graduated Filter.
Once you strike the “m” key, this opens the Graduated Filter, allowing you to click and drag downward so the mask applies to the top horizon line. Everything above the filter is automatically added, and the gradient is determined by how far you spread the bottom bar. To adjust the bottom bar only, hold the command key while dragging it down. Then you can quickly mask out everything but the sky with the color range mask. Using the selector tool, click in the sky—it helps that we added some blue tones earlier. Now we can start to add effects to increase the intensity of the soft sky.
After adding contrast, the sky starts to get too blue for my liking. This is easily fixed by lowering saturation. For a more HDR effect, I can increase clarity or texture to start adding intensity to the softness. The same process can be done for the architecture as we add a new filter and drag upward. Then, we can use the color range mask to remove the sky and subject. Also, if some areas overlap, we can lower the Amount slider. Boom. Now our image is ready for skin softening.
I typically use Portraiture for skin softening, but when I want to stay in Lightroom, I’ll use the adjustment brush by striking the “k” key. Now there is a quick preset to use for skin softening that lowers clarity, but I have really enjoyed lowering the texture slider instead. This offers softening without affecting any of the tonal range on the skin. It helps to use auto mask to keep the softening off the eyes and lips. You can also enhance the eyes with this tool to really offer decent retouching options for your subject’s face.
Non-Destructive Editing With Custom Profiles
Before we get started, we need an action in Photoshop to apply and be sure it only contains adjustment layers. Image layers will not properly export, which will cause issues with the final look. All of the layer adjustments can be found at the bottom of your Layers palette by clicking the middle icon. If you don’t have an action built, don’t worry—you can apply a few adjustments to get started. One of my favorite tools is the gradient map for converting to black & white; it’s also a quick way to color grade. If you haven’t used this tool before, I suggest adding it to your list. After adding a gradient map, you’ll see your image looks more like a negative.
This is simple to fix by clicking the reverse button so your gradient reads more like a standard histogram—the left side is black, gradually shifting to the right to make white. If you want to keep the image in color, you can change the Blend Mode to Luminosity, which will keep the tones and revert back from a monochromatic image. The same goes for Black & White—you can apply this to your image to quickly shift the luminosity of specific colors. Once you have a few layer adjustments applied, you are ready to export as an LUT.
To export, you will go to File in the top menu bar, hover the cursor over Export, and click Color Lookup Tables. When exporting, I typically leave everything at the default settings in the popup dialog box. You can add a description and copyright, adjust quality to high, and uncheck formats as you see fit. I will only need a .cube file for Adobe Camera Raw, so I’ll only select that option to reduce file clutter. The next screen is important, allowing you to name the file and store it for later use. Once this is done, we are ready to jump into Camera Raw.
Now that we have our LUT saved from Photoshop, we need to open Camera Raw to save it as a Custom Color Profile. Once Camera Raw is open, we need to navigate to the Presets panel. Just as we have done before with creating a Custom Color Profile from our slider adjustments, we need to hold the option/alt key and click the Create Preset button at the bottom of the panel. This opens the New Profile dialog box, where we can choose a name and where to store it in the Color Profile section. I leave the Tone Map Strength at Low (Normal) and check the box next to Color Lookup Table. Now I can locate that .cube file we created earlier and click OK. Now we are ready to apply this in Camera Raw and Lightroom.
If you have Lightroom open while creating a new profile, you will need to relaunch it to select it. You can find your profile at the top of the Basic Panel in Lightroom Classic version 8.1. Find the set you saved it in, and click the profile. What’s really awesome about using custom profiles is the addition of an Amount slider, allowing you to lower or raise this effect. This starts at 100%, and you can drop down to 0 or raise to 200. Now you can apply your Photoshop actions directly in Lightroom and work non-destructively, because your develop sliders aren’t affected. This is a massive game-changer for my workflow.
Edit in Photoshop From Lightroom
The Edit In feature is a popular option in Lightroom, allowing you to bounce between programs. You can quickly choose any image or images, hold command, and strike the “e” key. This converts your RAW file into a TIFF file and opens it immediately into Photoshop for you to apply your actions. If you want to change your preferences, go to the preferences External Editing tab to change file type, color space, bit depth, resolution and compression. I prefer using Adobe’s suggested settings of 16-bit ProPhoto RGB. Not a bad option, considering you can work one image at a time from Develop or select multiple images from Library. Now this would require us to apply the action manually for each image.
We can utilize the Automate Batch processor to apply an action to the opened images instantly. Under the Play settings, we can choose the set and action to apply. For source, we want to click in the box and select Opened Files. Last, you want to set the destination setting to None, so it leaves the images open—otherwise, it saves and closes your edits. Save and close would make sense if you were batch applying an effect and wanted the images to close and load back into Lightroom.
Once we save our edit, the newly created files are loaded into Lightroom next to the original RAW file. This really allows your workflow to be built on organization. Another preference you can choose is to have the exported copy stacked with the original. This allows you to collapse all stacks after you save edits in Photoshop and the RAW file is hidden. It’s very useful when exporting images for a client, so you don’t have duplicate color-corrected files following the creatives.
This workflow is great for quick edits and certainly small batches of images. However, if we need to export a thousand images with some simple adjustments that Lightroom can’t handle, it’s not a viable option. We’ll discuss how to deal with that in next month’s article.
The Results
Now that we’ve really dialed in the best images to apply some creative adjustments, our work is almost done. Start with the tools already in Lightroom like Local Adjustments, and expand to Color Profiles. Custom Profiles have single-handedly changed the way I work in Lightroom, since they don’t change my develop sliders. What’s even better is I can convert a lot of Photoshop actions as well as create new profiles in Adobe Camera Raw with the sliders if I don’t have actions. Once I combine these both into presets, I can edit multiple images instantly. Of course, if I need to edit further, the Edit in Photoshop feature works great.
Next month, tune in for Part 6 of this Lightroom workflow series, Finalizing Your Files. We will cover how to rename and reorder files, export presets and droplets, automation in Photoshop, and much more!


