
7 Tips for Making Compositing Easier with Ben Shirk
I love compositing, and it’s pretty much what I’ve built my entire business around. I’ve become known as one of the top studios in the nation for creative composites. Seniors travel from every corner of the US to my studio, I create composites nearly every day, and I’m very fast.
One of the comments I get most often from photographers on my social media posts is, “How long did that take?” That’s somewhat of a trick question, because I’ve been compositing for a while now. I create thousands of composites a year and have everything set up to make what I do fast and easy. Don’t get me wrong—just because I can create something quickly doesn’t mean that it isn’t quality. I pride myself in realizing super creative, personalized images for my clients, but because I have taken the time to set up a system, I can create amazing images quite quickly. Whether you are a high-volume photographer or a boutique studio, here are some of my top recommendations that anyone can do to help streamline their compositing.
1. Find a background
Yes, the first step to make compositing easy and fast is to find a background before you photograph your subject. Knowing your background will allow you to take into account all of the variables in a scene. If you know the variables, then you can photograph your subject appropriately so that they “belong” in the scene much better. If you are just starting out or just want to save some time, then consider a stock image or template. Creating a background from scratch can be a fun challenge, but it can certainly take a great deal of time.
2. Light your subject appropriately
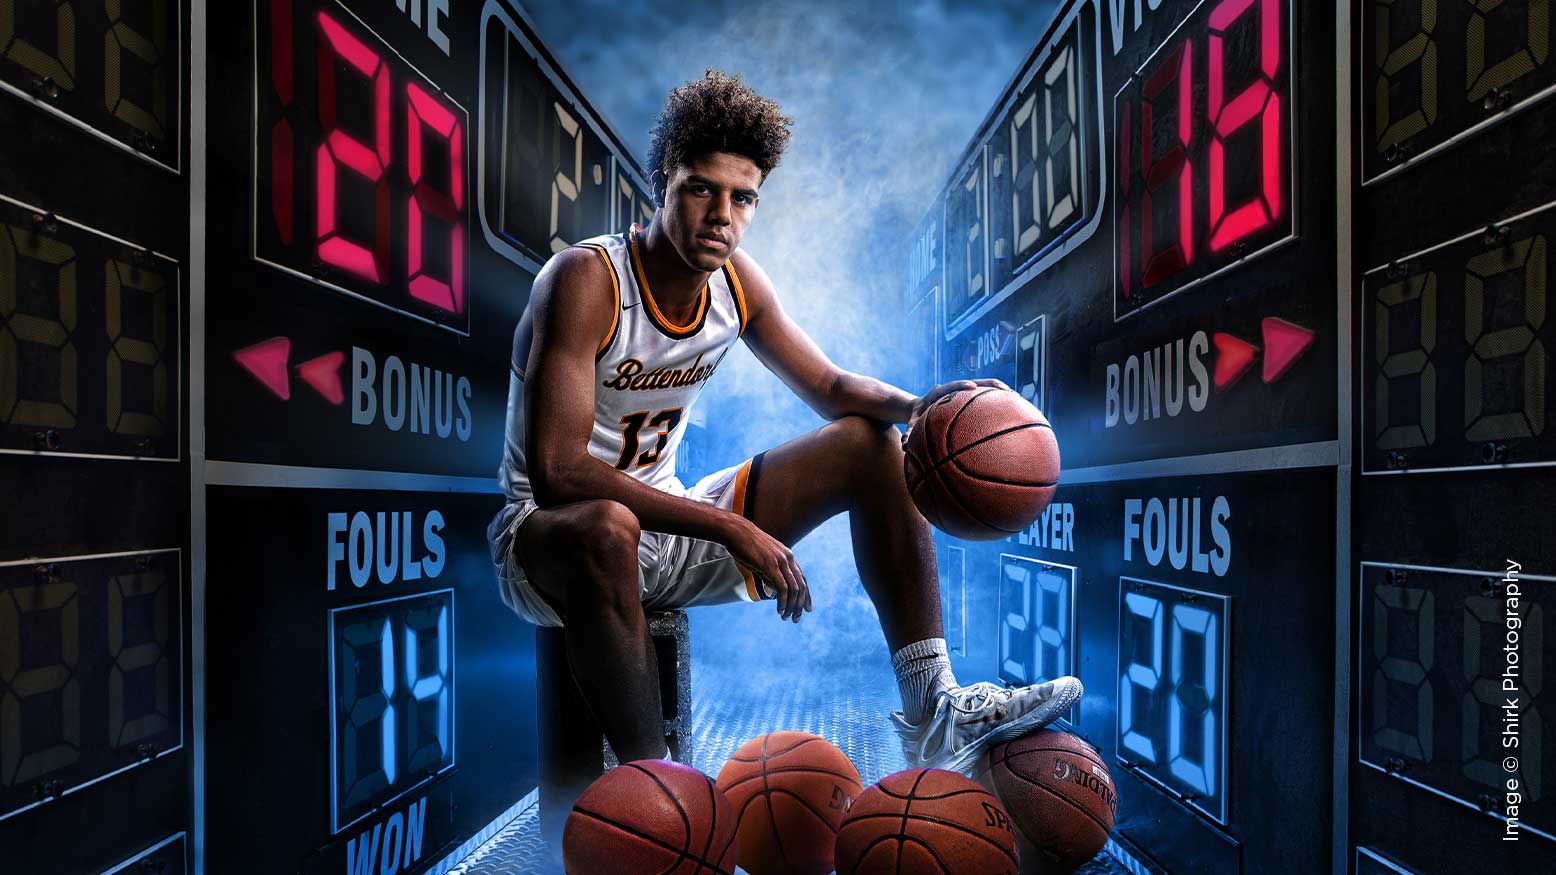
One of the most difficult things to change in post is the light on your subject. It can take huge amounts of time to dodge and burn areas to match, and heavy dodging or burning seldom looks good. Look at your background before you start. What direction is the light coming from? Is it from directly above, behind, to the left? How bright is the light? Are there multiple sources? Now that you know what light is in your scene, you can light your subject similarly. Many of my athletic composites are darker night scenes with stadium-like lighting, so I use studio lights to make them look dramatic and tough. However if your background is soft, natural light, then photograph your subject using soft, natural light.
3. Hide your subject’s feet
One of the most difficult things in compositing is connecting your subject to the ground. Finding a way to hide your subject’s feet can be a huge time-saver. One of the easiest ways to put someone into a scene is to use a close-up shot and add the appropriate background behind them. By cropping in, you don’t have to draw shadows around their feet, and it will save you tons of time and frustration, especially if you are newer to compositing. When your subject is not connected to the ground, it will also give you a great deal of flexibility in the angle and perspective of the scene. When I build templates for others to use, I often spend a lot of time trying to incorporate some feature that will allow part or all of the subject’s feet to be hidden, making it easier for the user. However, for many of my personal projects, I love the challenge of trying to incorporate the whole subject.
4. Make your extractions easy
The industry standard for nearly instant extractions is green screen. The benefit of using a green screen is that there are actions and plugins that take the work out of extractions and make it simple and easy to extract a subject. Quick extractions allow you to get right to the fun part—the art. Don’t have a studio? No problem. Green screen doesn’t have to be just in studio—there are portable, pop-up green screens that can easily go with you on location.
5. Automate things that you do regularly with actions
If you do the same thing multiple times, it is easy to record the steps in your actions pallet so that you can simply hit play the next time. For example, say that each time you go to create a composite, you create a new document, fill the background with black, create a four-pixel white border, and add your logo. That can all be an action completed in a single click. There are also lots of actions you can find online to help with toning, detail enhancement, and color—these can help make your retouching and blending process more efficient.
6. Use your keyboard shortcuts and quick keys
Instead of taking lots of time navigating through the different menus and dropdowns, learn the faster way. Quick keys can do all kinds of things—for example, (B) brings up your brush tool and (E) brings up your eraser tool. You should also memorize most of your keyboard shortcuts, like cut and paste (ctrl/cmd C and ctrl/cmd V) and Transform (ctrl/cmd T). There are many others that you should add to your repertoire as well. If it’s an item that you use often and you don’t know the keyboard shortcut, you can find the button sequence listed alongside the actual command in the photoshop menu. Once you find it, use the keyboard shortcut keys instead of the menu so that your fingers begin to remember the sequence. Even saving a few seconds each time can make a big difference in your production time.
7. Above all, know how to use your computer program
The majority of compositors use Photoshop. Knowing the controls and options will allow you to focus on the artwork instead of stumbling around looking for a filter or tool. Yes, being comfortable and knowing Photoshop well will take some time and effort. But seriously, since when was anything worthwhile easy to do? Shut off Dancing with the Stars and The Voice and instead spend some time playing around in Photoshop. Make yourself better. Get comfortable using layers and the variety of tools Photoshop offers. If you want to increase your Photoshop skills, it is fairly easy to find tutorials on the internet that you can learn from. If you learn better in person, then consider some hands-on training at a workshop.


