
A Beginner’s Guide to Migrating From Lightroom to Capture One with Dustin Lucas
Want more information on this article? Get access to video content and additional supporting images. Launch the August 2017 issue of the magazine by logging in or signing up for a free account. Shutter Magazine is the industry’s leading professional photography magazine.
For all the Lightroom users out there, take a deep breath. This is gonna get messy. Over the past year or so, I have been reading a lot on Raw processing programs and been encouraged to revisit Capture One. Coming from a long history with Lightroom and understanding the limitations of this very efficient software, I am constantly looking for a package that produces better-quality images at the same pace.
I am not officially letting go of Lightroom. With this article, I intend to show the possibilities of migrating from Lightroom to Capture One. I am not here to bash on Lightroom for quality or on Capture One for user efficiency. Everyone wants to spend less time editing and still deliver a quality product. If you haven’t already familiarized yourself with Capture One, download a free 30-day trial and watch the knowledge-based videos.
Learning the Basics of Capture One
Once you launch your trial version of Capture One, you are ready to create your Master catalog. There’s a familiar term for you, catalog. You can save the catalog on your computer’s hard drive and not worry about running out of space. We are ready to import files into our newly created catalog. So far, everything emulates the Lightroom file-ingesting process. These images I am importing have been preculled in another program. You can’t beat Photo Mechanic for speed and price.
The import module is a lot different from working in Lightroom. Let’s go through the options. First, we must choose the location of our Raw files. On the top left-hand side of the window, it starts with Import From. Click in the dropdown box next to Source. A more efficient way is to find the files in Finder, drag and drop the folder, and Capture One starts populating the files. The Import To section is next, and defaults to “Current Location.” This simply means the Raw files will be added to the catalog much like in Lightroom. You can copy files from a memory card or a hard drive to a new location by clicking “Choose Folder.” There is a third option to save the files inside the catalog file. I find this to be useless, and recommend not doing so for the sake of backup.
Many of the same options from Lightroom are here as well, like Collections, File Backup, Naming, Metadata and applying import presets. Presets or Styles can be created the same way with specific settings applied to all images entering Capture One. Along with presets, you can choose Auto Adjust for quick histogram-based adjustment of exposure, contrast, brightness, highlights and shadows. Now we are ready to import our files. The only missing option in this step is choosing type of previews to build.
Previews are handled differently in Capture One and Lightroom. Lightroom allows you to build standard and 1:1 previews, requiring the original files to be linked to your catalog. In preferences, you can set the dimensions and quality of standard previews to lower the time it takes to generate each preview. Smart previews are championed in Lightroom because you don’t need the originals to make metadata and develop adjustments. These actually allow you to sync capture time without the original linked as well.
Okay, great, so what are our options in Capture One? In Capture One’s preferences, under the Image tab within the Cache section, you can choose the preview’s long-edge dimensions. It’s defaulted at 2,560, which is almost the same as the dimensions for Lightroom Smart Previews. You can increase this file size if you find yourself needing a 1:1 or 100% preview of the file; otherwise, keep it at 2,560. Like Lightroom, once the previews are built, you can disconnect your external hard drive and work offline. This is no longer a bonus feature. It’s an industry standard set by Adobe. Now let’s dive into the unfamiliar user interface.
Customize Your Workspace in Capture One
First things first, we have to change this layout, or what Capture One refers to as the Workspace. I prefer the Lightroom-styled layout, but if you are working on a single monitor, you don’t have the option of toggling multiple screens. There are plenty of custom workspaces built for previous Lightroom users. Google “capture one workspace lightroom” and “capture one keyboard shortcuts lightroom” to get started on the right path. Here are some quick changes I made to get us more familiar with Capture One.
I want access to modules like Library and Develop, as well as shortcut keys for syncing images. These options make Lightroom efficient for me. Let’s change the keyboard shortcuts by clicking in the menu bar Capture One 10 and selecting Edit Keyboard Shortcuts…. In the newly opened window, click Create and name it. (12) Below there are two categories: Command and Key. Click the “>” next to each command to access each keyboard shortcut. (13) You’ll notice the command names match the menu bar: Capture One 10, File, Edit, View, etc.
Under the View category, we want to mimic “grid mode” from Lightroom. The Library module in Lightroom can be used as “Viewer” in Capture One. Choose the Show/Hide Viewer command and assign “G” to it. Now we have grid mode whenever we want. So how can we toggle grid mode and our Develop module like in Lightroom? We need to further customize our workspace to get better acquainted with editing in Capture One.
For starters, the filmstrip is vertically positioned on the right side. It looks like Library is on the left, and I am seeing a small grid of my images in the middle. I need to see one image at a time when editing, so let’s change that first. Navigate to your menu bar, click on View, hover your cursor over Viewer Mode and choose Primary View.
We need to move the filmstrip to the bottom of our screen. Click on View in the menu bar and click Place Browser Below. You’ll notice you cannot cycle through the images like a filmstrip. We need to change the Browser to Filmstrip Mode by clicking the appropriate symbol right above the first image in the filmstrip. Now we can cycle to the left and right easily with the keyboard arrows.
Now we need to move our Tools to the right-hand side for quick access. Click on View in the menu bar and click Place Tools Right. You’ll notice at the top of this panel there are symbols to click in order to move into different modules. These are called Tool Tabs. These can be customized by order of importance: Add tools, remove tools and even remove whole modules. I like Library on the left and my editing tools on the right. This is how I customized my layout to better match what I am used to. It is simple to click on an individual tool and drag it to another location, and that is precisely what I did with Library and Presets. (22) The only final adjustment I need to make is to drag the entire window from the left so the image isn’t cut off. (23)
Lastly and most importantly, save you Workspace by clicking Window in the menu bar. Hover your cursor over Workspace and select Save Workspace. (24)
Migrating Lightroom to Capture One
Now we are ready to import existing Lightroom catalogs into Capture One. Before proceeding, you have to understand that Lightroom and Capture One are proprietary Raw processing programs. Lightroom saves our .xmp files, while Capture One saves .cos files. This means they save metadata differently and some information is noninterchangeable. Also, your Lightroom catalog must be linked to your original files. Smart Previews are rendered virtually useless for Capture One catalog importing.
With your Capture One catalog open, click File in the menu bar, hover your cursor over Import Catalog and select the Lightroom catalog. (25) You’ll notice a dialog box stating what metadata will be imported. You can turn off this dialog window for future catalog imports by checking the box in the lower left-hand corner. (26) Now let’s continue by choosing the Lightroom catalog and waiting for the import process to complete.
After importing the catalog, we can start to refine the edits and even compare our results with Lightroom. (27ab) I do not want to get into a long-winded debate on which image is better or how we can get them to more closely match. Just keep in mind that things like highlight and shadow recovery, clarity, vibrance and camera profile are not applied. Capture One also has different default settings for sharpening, noise reduction, lens correction and camera profile. Let’s move on to more ways to make Capture One more friends among Lightroom users.
Tips and Major Differences
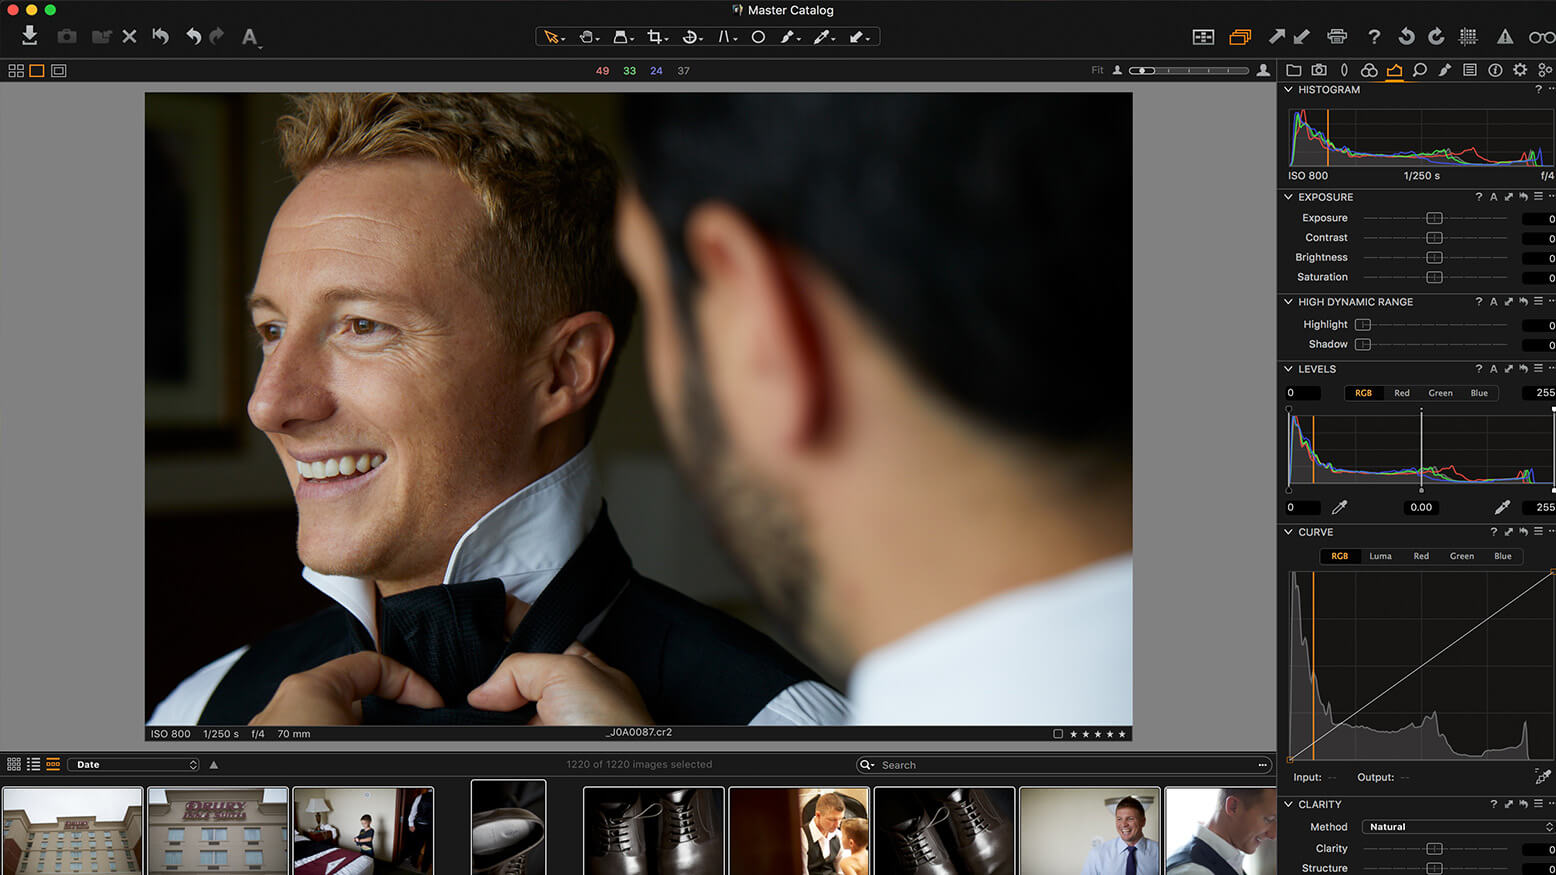
Make Capture One more personalized and efficient for your editing needs. Don’t get caught up in all the default tools in the Tool Tabs. Remove tools you do not need for editing and expand the ones you need. I match the Lightroom Develop module with the following tools: white balance, exposure, high dynamic range, levels, clarity and curve. (28)
One thing I am stuck on is syncing edits between images quickly by holding Shift and Command while striking the “S” key. Bypassing the copy and paste settings is a two-step process. There is an option called Copy and Apply Adjustments in Capture One that we can assign that same keyboard shortcut to. (29) Now we can simply edit one image selected in the filmstrip, click the last image in a similarly shot sequence and sync images. This editing workflow is crucial for me in Lightroom. (30ab)
One big difference is the lack of before and after previews in Capture One. While this seems like a purely cosmetic difference, inevitably I need to see the as-shot image to compare it to the edited one. There is a workaround by creating “variants” that are comparable to virtual copies in Lightroom. To select all images, hold Shift + Command while striking the apostrophe key. (31)
I have not had success doing this to 1,200 images. My catalog freezes every time. If I want to see my image as shot, I have to hold Command and strike the “R” key to reset it. Then I can reapply the edits by holding Command and striking the “Z” key. Not the worst thing in the world, but it’s frustrating they will not implement this user option. (32)
Much like Adobe Camera Raw’s editing interface, you are stuck clicking on a slider and adjusting with your mouse. There are convenient but expensive specialized keyboard and midi systems for more efficient editing. Why can’t I just hover my cursor over a tool’s slider and use arrow keys to adjust the settings? I can reset the slider by double-clicking it, and temporarily reset the slider by clicking on the name listed to the left. This is helpful, but I can’t rely on keyboard shortcuts for each individual slider. I guess I just have to get used to it.
Final Thoughts
The change from Lightroom to Capture One is a challenge at first. They look completely different, and I am sure you had the same feeling before you used Lightroom for the first time. Learning the interface, customizing your Workspace and designating keyboard shortcuts will save you the most time. With the integration of Lightroom catalogs, you can simply import all of your previously delivered catalogs.


This Post Has 3 Comments
Pingback: Mastering Capture One: A Free Guide. Essential Training
The latest Capture One update has a key-mouse sequence to see the before / after. Hold Opt and hold left click the Reset arrow in the top row of icons on the left to see the before. Release and you see you edits. Each individual tool also has this capability.
Great article. Ive been toying with the idea of just starting a side by side of Lightroom and Capture One just to see which I like better. Ive been a LR user for a long time now… luckily I chose it in the beginning over Aperture… Additionally, I utilize PC CC and OnOne 10.5 for special stuff as needed.
Any particular reason you (or anyone else) made the jump to Capture One after being on LR for a period of time?