
Bringing Composites to Life From Story to Final Vision with David Byrd
I recently had the pleasure of experiencing Project Lunacy for the first time, and, oh my, was it an interesting ride.
On day one, we hit the ground running with Sal as he taught a new platform. He had one major nugget of wisdom that hit me like a truck. He showed us how he creates with intent by walking around the room and seeing what spoke to him.
He settled on a great symmetrical part of architecture in the room and began his process of creating beautiful imagery. I caught only bits and pieces of the image making because I sat dumbfounded in the knowledge that Salvatore Cincotta’s creative process is similar to my own. As I reflected on it, I began to wonder if this process was true for others.
The Spark of an Image Begins…
To bring a story to life through composite art in Photoshop, I often begin with the existential question: What is speaking to me? This doesn’t always come in the form of a place or location, as it did for Sal that day. The spark of an image can begin with a single emotion, a piece of music, a line from a play.
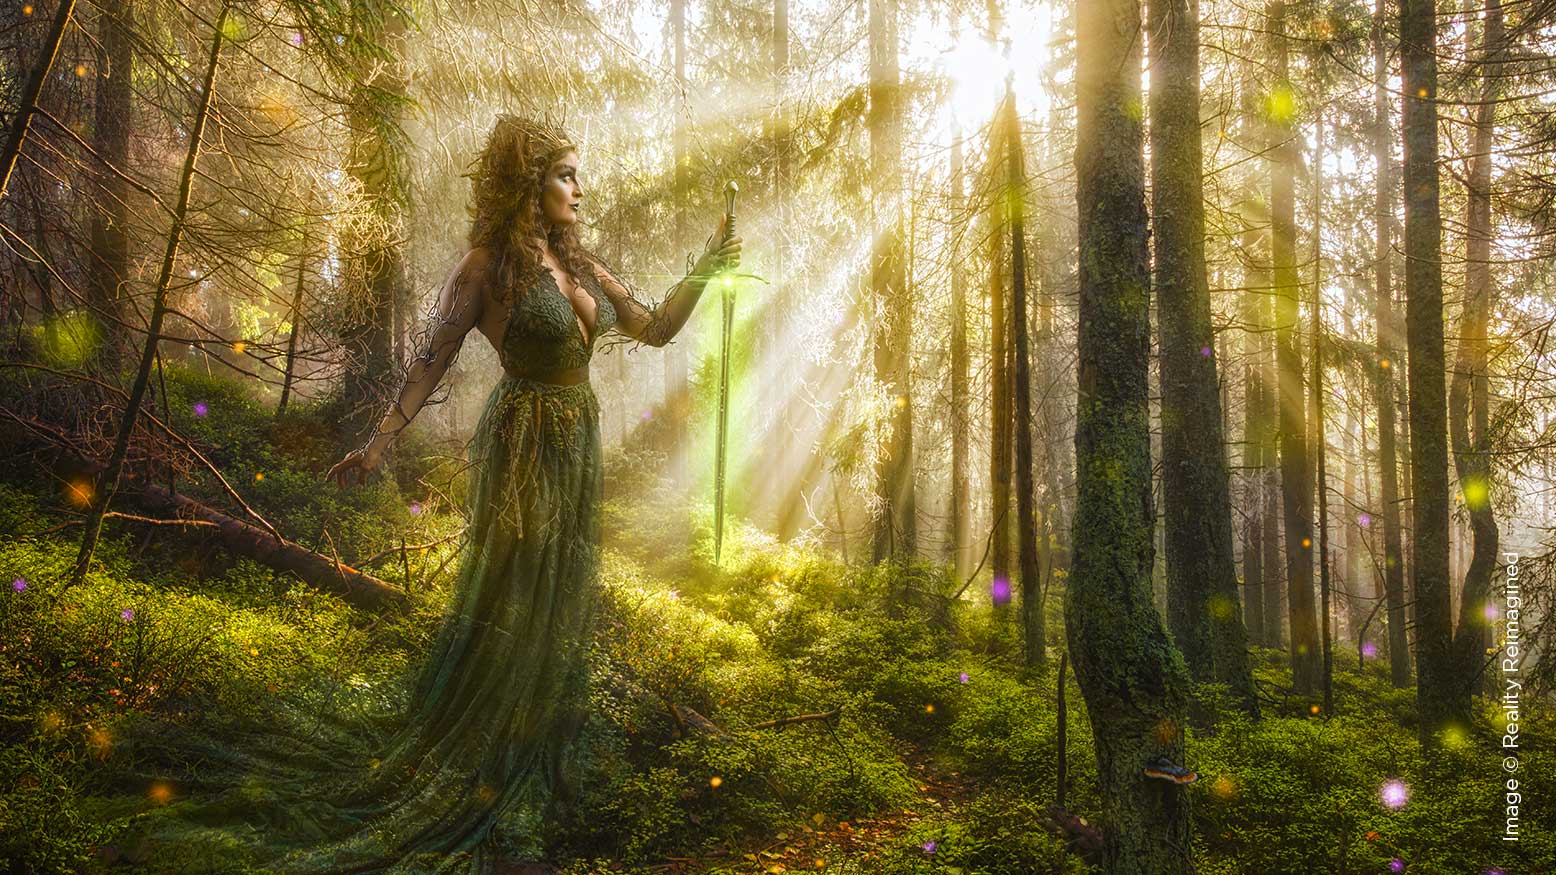
The piece featured in this article, “The Spirit of the Forest,” began with a location. I grew up in the Midwest but now live in the Southwest. The Southwest has an exotic beauty unlike any other place on Earth. Both worlds speak to me, but I found that I missed the voice of the Midwest, with its endless rolling hills of grass, trees and flowers, the steady march of picturesque seasonal changes. When I had a private workshop in Green Bay, Wisconsin, I spent three days driving there, and noticed the transition between my current home to the one I fondly remember.
On that drive, I thought about where I wanted to be in a year, five years, when I am an old man sitting in a chair admiring the fall colors. I felt the progression of time in a way that I never had before, and felt a renewed sense of spirit to forge my way forward through time. The passage of time and the forest landscape of the Midwest—that is what spoke to me as the driving force behind this piece.
Building Roots With a Little Help From a Sword
I began with our model Cassi and the brilliant design she is wearing by Rachel Frank Designs. I knew the world I would be building around her and the intent behind it, so I started with how she fit into that world. As we flowed through poses, I molded her movement into that of the ethereal spirit I saw in my mind, a sense of grace, power, life and the gentle wisdom that one would find there. The length of the dress and its many layers became analogous to the roots of a tree and thus her connection to the forest. The poses suggested the movements of a ballet dancer, grounded by the dress. We saw her emerge from the life around her.
Our story of life and the personal connections were there, but a final integral piece was missing. I visualized myself walking through a forest of beautiful color as I had done so many times in the past. The smells and sounds were all there. And then I realized that almost every time I would go on that walk, I would pick up a leaf and take it home with me. It was a symbol of the serenity of the forest, and it anchored me to that magical place. I knew then that Cassi had to be holding something, offering us something to take with us that would help us battle the outside world. I also wanted a juxtaposition to the grace of the forest to reflect that forthcoming battle. So we brought in the sword.
We experimented with poses of Cassi holding the sword as if she were prepared for battle, and it immediately felt wrong. The forest was a place of life and grace—it couldn’t fight our battles, it could only renew us to face our own struggles. I had her hold it to mirror the Sword in the Stone, and in that moment, the final vision came into focus. I saw the forest around her, the light streaming through the trees, the various colors and the ground foliage that I would integrate into the dress to tie it all together.
Bringing It to Photoshop
For every composite I create, I begin with a general retouch of the subject in their original image before I extract them. I start with the skin, smoothing out all of the textures, and then adjust any areas that are distracting. I then move to frequency separation, my first artistic pass over the image.
I use frequency separation in ways that would make most professional retouchers throw their pen tablet at me. It’s an opportunity to paint like a traditional artist. Simple issues like wrinkles in the fabric of the dress can be adjusted during this process, but I can also create new folds in the fabric to give it that effortless drape and flow.
The real fun begins when I move from frequency separation to dodging and burning. I use the curves adjustment layer method, with one layer for general highlights, one for shadows and a third for strong specular highlights that define the structure of the face and key areas of the body. I always start with shadows to accentuate the sense of drama that I have created with my lighting.
Beginning in one region of the body, I enhance shadows so I have an overall visual map of where we are sculpting. Once I have all of the shadows in place for that region, I move to the corresponding highlights of that same zone. If there are any specular highlights needed, I do those last and bring them in as subtly as possible. After all of the regions of the subject have been sculpted, I bring down the opacity of the shadow layer until it blends with the highlights, creating the form that will draw the viewer’s eyes to the key areas of the subject.
Since this piece required special effects (on the sword), I retouched the sword similarly to how I did her body. This included removing distractions, painting with frequency separation to augment the shape of the blade and then dodging and burning to give it a three-dimensional life. The glows and particles came later as the final image began to take shape.
Extraction
To extract my subjects, I use the quick selection tool and go through the process manually rather than letting Photoshop decide for me with Select Subject. I begin by lightly tapping on the subject, usually in the center of their body, so that Photoshop can target the pixels I’m looking for. Sometimes the algorithm can go too far and grab parts of the background, but a reduction of the selection gives Photoshop the guidance it needs.
Once I have a great selection in place, I move to the Select and Mask option that is available while the Quick Selection tool is active. In this new dialogue, I can use the most powerful aspect of the quick selection process, which is the Radius dialogue and Smart Radius. Check Smart Radius and set a threshold of pixels between 8 and 12, and Photoshop will further refine the edge of the selection and provide you a feathered edge. Of course, there will always be troubled areas of this process, but until Skynet takes over Adobe, you’ll have to rely on your own mind to fix these areas with a mask.
To do so, drift down to the Output To dialogue and select New Layer With Mask. When you approve these adjustments, you’ll be brought back to your workspace and a new layer will be created with a layer mask. Your original background layer will be turned off so you can see the transparency of the mask.
Refining the Mask
I spend a great amount of time refining this new mask. I go around the perimeter of the subject and paint either black or white on the mask to gently create the perfect selection. This can be a time-consuming process and a bit daunting, but it is essential to your composite. That’s because as you move into the final vision and add special effects and other elements, if you have a rough selection of your subject, effects like Outer Glow will reveal those issues and reflect on you as an artist. Take great care with your mask, and you’ll get questions like, “How did you get such a sharp, beautiful edge to your subject?”
World Building
When the subject is ready to go, I create a new document that will become our future composite. I create a 12-inch by 18-inch canvas at 300 ppi in 16-bit mode. A 12×18 image will scale to 24 by 36 without having to adjust crop. It also allows you to keep the document data size a bit smaller, which is key as you continue to add to your composite.
To create a world, I start with the ground the subject is standing on. The stock I use has the same perspective angles at which the subject was shot. If I were kneeling down when I photographed Cassi and then used a stock image of the ground shot from far above, the viewer would know something was horribly wrong.
Once I have that ground in place, I add foreground and background elements to finish the horizon of this world. Lastly, I add an appropriate sky stock that fits the mood of the scene and tonally matches the background.
For this piece, I used only one stock image: the forest. I added a sun flare to the sunlight streaming through the trees to increase the drama and power of the sun.
I blended the dress into the ground foliage to create the illusion that the rays of sunlight were interacting with the sword and Cassi, as if she were actually there.
To blend the dress, I used a simple process in Photoshop called Blend If. Go to the Layer Style window of any layer (Layer/Layer Style/Blending Options) and navigate to the bottom of the window to find the Blend If dialogue. Here you instruct Photoshop to either blend the existing layer with the one beneath it or vice versa. Set your threshold to gray and not red, blue or green. This allows Photoshop to begin the blending process with either the highlights, shadows or midtones of the corresponding layer. Moving the highlight or shadow sliders left and right will yield terrible results.
Instruct Photoshop to use the midtones to feather the effect. Hold down the Alt key while placing your cursor directly in the middle of the triangle symbol. When you click, hold and drag, the triangle splits and you now have midtones to work with. I chose the layer of Cassi and made a duplicate of it, then turned off that duplicate so I could see only the original layer of her. I’ll explain why I did that in just a moment. I used the midtones of this layer and started blending the shadows by splitting the triangle on the left. As I brought it toward the highlights, slowly, I watched the interaction of the shadows of the dress with the shadows of the forest beneath it until I found a good balance that made it look like they were intertwined.
Now that duplicate layer comes into play. Since this layer has not had any adjustments via Blend If, I can carefully paint in key areas to finish the effect. I added a Hide All Mask—or “black mask”—to the duplicate layer. I painted white on this mask at an opacity of 100% and a flow of 5%, and gently started bringing the real image of Cassi back into existence. This allowed for a transition to take place between the real image of Cassi and the Blend If layer of her—making it appear as if she were merging with the forest.
To create the sunlight interaction between the sword and Cassi, I created a blank layer above her and then started painting in a soft white/orange color in the same direction of the rays of light. I refined these using a mask until I had a clean edge where the light would hit her body and pass through or be blocked, depending on the area of special effects.
Magic Swords
To create the magical sword of the forest, I made a selection of just the blade itself and created a new layer of that. I added an outer glow to the blade (which is why the selection and mask need to be perfect) and expanded the glow out to the maximum size allowed. I made a new blank layer above the blade layer and changed the blending mode of this new layer to Color Dodge. I painted a golden green color into the blade to give it its magical power. I added some glowing dots in a sparkly pattern around the sword to give texture to the magic.
Final Vision
Once the foundation of this composite was complete, I moved to the most rewarding part, which is adding my own artistic style. Every year I evolve my artistic enhancements. I start by adding a new color palette that I infuse into the whole piece.
The shadows are a certain color, and then I choose a complementary color for the highlights. This unifies the composite to convince the viewer that it’s real. I add textures, sharpening and other adjustment layers to achieve my vision. I add a soft vignette to the image to drive focus to the areas where I want the viewer to begin the journey of my art and the story it’s telling.
This piece came to life because I asked myself a simple question: What is speaking to me? This can be the defining moment that leads to a beautiful, award-winning image from an artist like Sal or the creation of a world of fantasy from my imagination. Ask yourself the same question and set yourself up for creative success. Go for a walk in a forest, listen to your favorite music or just stand in a venue for the first time. Close your eyes and listen to the voices around you.


