How to Take Your Lighting to the Next Level with Alexis Cuarezma
For photographers and visual artists, light is one of the most important pillars to your work. From a creative standpoint, it’s a visual language that allows you to express and enhance the emotion you’re trying to evoke to the viewer.
From a professional point of view, understanding light and being able to execute your vision ‘at will’ despite the time of day or the location makes you an incredible asset to your client. Light is both an art and a craft. This broad spectrum can make lighting a daunting task to learn and teach. However, one simple philosophy of light can help clarify everything. There’s good lighting, there’s bad lighting, then there’s the RIGHT lighting to help express the emotion you want.
In other words, “pretty” light isn’t necessarily always the right answer for your shoot, otherwise, there would be a one type of lighting setup that everyone would use all of the time. When I’m working on a photo shoot, the subject matter and the situation I’m photographing directly affects my approach to lighting. For example, my approach to photograph a professional athlete versus my own family is completely different.
For a professional athlete, my visual approach can be extremely stylized and abstract. I’m completely okay with reducing the athlete (or talent) to a visual icon to make them appear mysterious or heroic. In some cases I might want to visually transform their appearance to the point where they are almost
unrecognizable. That approach can work perfectly in that scenario, but obviously for a family member or a personal client, you want to clearly see the person and the light you’re using needs to serve it’s purpose.
With the above in mind, my approach to lighting will generally fall into three specific categories:
Lighting for darkness – creative, abstract and can also be colorful
Flooding with light – light and airy, natural looking
Enhancing natural light – If I’m in a situation where the location and time of day affects my frame, then I will work on enhancing and working with the available light.
All three of these approaches can be done with either a lot of lighting gear or a minimal amount depending on your approach. It’s not a requirement to have a lot of lighting equipment to take your lighting approach to the next level. However, what is important is having a working knowledge of how light works, having a specific vision and knowing what you have access to. You can use a DIY approach using “found objects” like parchment paper and bed sheets. However, I always recommend to make the investments you can afford to make. The reason being that professional tools and lighting equipment will certainly have more durability, flexibly, control and convenience in your work.
Natural Light
Lets start with something simple (and effective) that anyone can do to step up their lighting game. This falls into the 3rd category of lighting I mentioned previously (enhancing natural light). If you’re planning on using available light, you want to set yourself up for success and be ready if there isn’t much ambient light. Therefore you generally want to use a lens with a fast aperture. By a fast aperture, I would recommend F2.8 or faster. In situations like these, my preference is to use primes lenses.
There’s lots of expensive and nice prime lenses out there but this doesn’t require a lot of money. Sigma has a trio of F1.4 prime lenses that are amazing and affordable. I used the Sigma 55mm F1.4 lens with a Canon M6 Mark 2 to make the following images which both cost under $1,000 each.
These are photos I took of my family during mother’s day. For a situation like this, I don’t want my lighting to get in the way of the moment and memory. When you’re shooting with available light which in this case is the Sun, you ultimately can’t control where the light will be, or what angle it’s coming from, but you can control where to place your talent and the direction they face.
For these photos, I made sure everyone was back lit to give a nice rim light & glow. However, you still need to make sure they are lit well in the front. Purely back lighting someone in a situation like this can result in okay results. A simple way to enhance the look and feel is to use large bounce cards to kick back light. You can use anything white, and large. In this case, I used 2 V-flats from V-Flat World folded in half. They worked amazing b/c they have a matte finish. This gives you a very subtle yet effective bounce that instantly gives you more professional looking photos in camera. It also affects the eyes as well making everyone look more lively. For a situation like this, I personally avoid a silver bounce because it produces a more speculator and punchy light. This will result in the image looking lit which I don’t want in this situation. Hanging white bed sheets behind you or even placing them on the ground can work great as well.
Continuous Lighting
If you want to ease into lighting, using continuous lights is a great way to do it. The advantage they have when you’re first starting out is they’re WYSIWYG – “what you see is what you get”. You can also use continuous lights for video. Seeing the immediate results right in front of you (in real time) is very helpful when you’re starting out. For light, I always prefer & recommend a hard, punchy strong light. It works great when you need a hard light source and you can always bounce or diffuse it if you need a soft light.
By using the same V-Flats in the previous example, and adding 2 hard lights we can completely change the look and 100% illuminate our frame with our light. We just need to make sure we’re in place we can control the ambient light to keep it dark, since continuous lighting can’t easily overpower it like strobes can. So being indoors or blocking off any light affecting your frame is essential.
This is one of my favorite setups because it doesn’t require a lot of room. For my continuous lights, I use 2 Clx8’s from Light & Motion with the 25° Fresnel attachment. You place 1 V-Flat behind your talent using the black side. This cleans your frame. I use one light as a rim light, and then bounce the other light into another V-Flat folded in half for a nice soft light. This is a very simple, yet effective way to produce clean & professional looking images.
Using strobes is a great way to completely control the look and feel of your image. Since it’s a burst of light, it can be very powerful therefore making it easy to overpower and completely cut out the ambient light. Often times, when I’m using strobes, if I take a photo without triggering the lights, the frame will be completely black. This way, I’m controlling everything that’s seen in the frame.
I generally start with one light, see where the shadows fall then add lights to fill in those shadows and/or to light other parts of the frame. A principle of light is the inverse square law. In short, what this means is that light “fall off” is exponential the closer you are to the light source. And the further you’re away from the light source, the lesser the “fall off”. We can use this principle to our advantage. Here’s
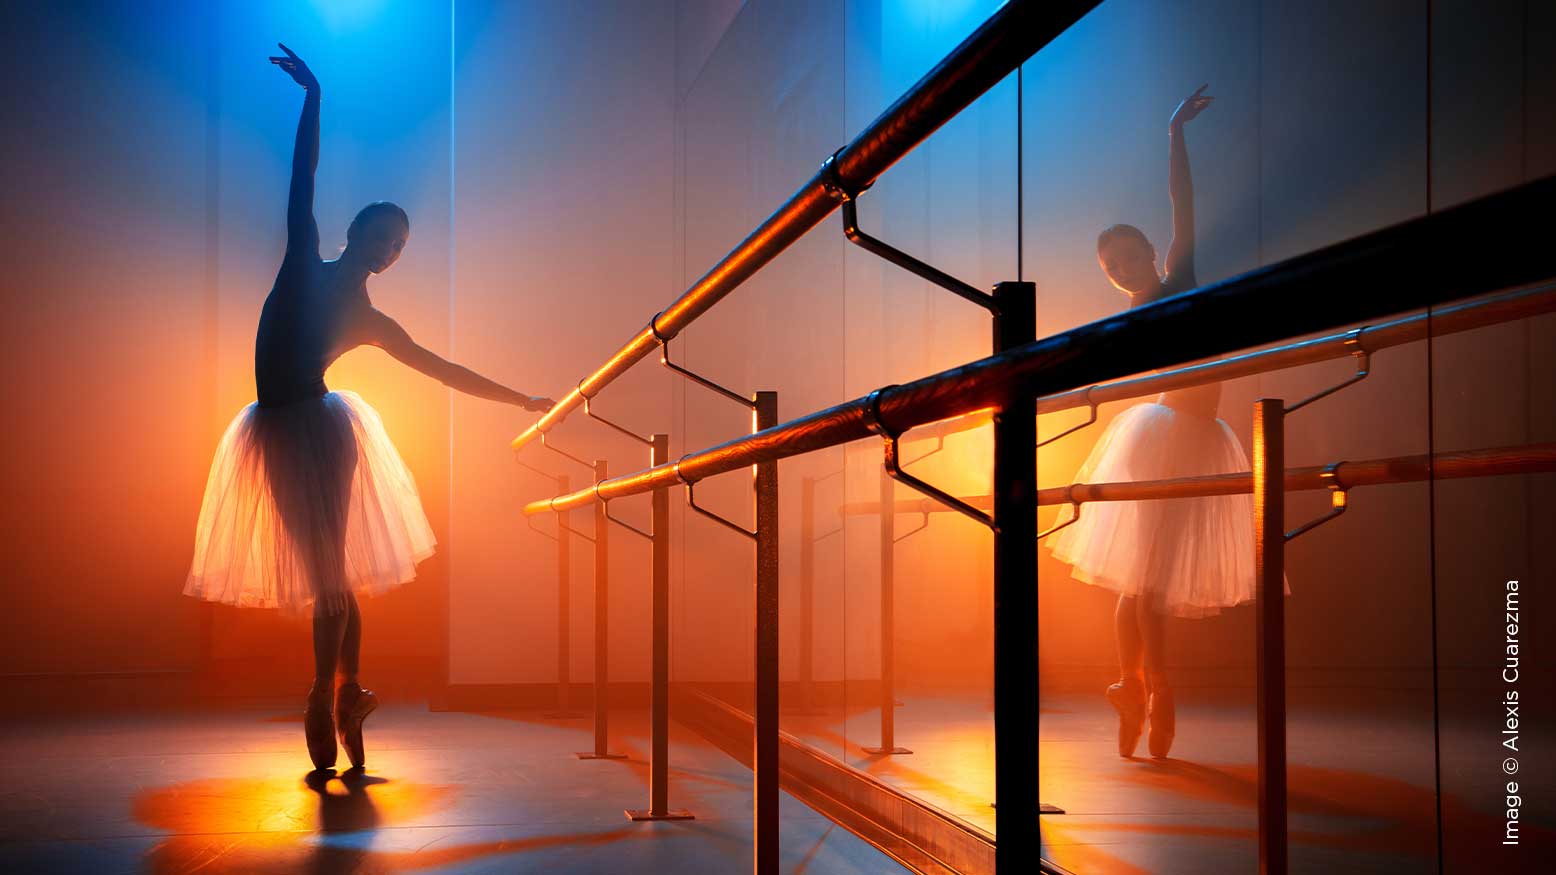
an example of a 1 light setup using 1 Profoto B1 with a 7inch reflector, plus 10 degree grid to control the light spill. I wrapped diffusing over it make the light less spectacular.
The reason the light is so close to her is because I wanted there to be light fall off within the frame. Meaning, the exposure from the top of her head is brighter then the bottom where her hair is. Exposing for the top will give you a dark gradient as the light falls off. I used a silver bounce to throw highlights on her face where you normally see shadows. This gives the image a stylized look and it’s all done using only one light.
We can completely change the look of this image by simply adding a second light, gels & removing the bounce. Which is what I did in this image. I added a red gel and shot it through the 6×6 scrim that was behind her. Then added a yellow gel to light above her.
Both of those are examples of using lights close to your subject to achieve light “fall off”. How about when that works against us, and we don’t want that? In that situation, you need powerful lights for example – when lighting an entire basketball court. For this basketball shoot, I needed to use 2 Profoto 10A packs at full power (2400ws). The reason is because the lights needed to be high and far away from the rim as possible, and I had light loss from using gels. To get the exposure I wanted (F13 ISO100 at 1/200th) throughout this large area, I needed all this power. I dropped my Kelvin temperature in camera to 2800K to turn strobe blue, and over corrected the 2nd light by combining CTO & CTS Rosco gels and make it warm. This gives the image a complementary color palette in camera. Adding atmosphere and using a hazer is important as well because it lets you see the light rays.
Finding your Style
I always start with the project on-hand, and I try to have a story in mind that I’m trying to
tell. You need to ask – what emotions does the talent, story, and location elicit from me?
You have to get familiar with lighting so you can make decisions on intuition. Style comes from interpreting things, and making the decision of how to light a subject and what colors to use. The key to finding your own style and voice is to trust yourself (over everyone else). That can be
one of the most difficult things to do because we all have cases of self doubt.