
No Storyboard, No Problem: Working Quickly With Video and Vision with Andy Strong
I love how traveling to a new location gives the brain a creative jolt. There are new problems to solve, new scenarios to uncover, new pathways to forge with our feet and in our brains. It can be challenging to reach outside comfort zones, but once we wander off the well-worn path, the thirst for thrills sticks with us. We are doing things we’ve never done before, and it’s exciting.
A storyboard makes the final product tangible. When working with a script, storyboards are a roadmap on which your film is built. But what happens when the script is being written in real time, as in a documentary-style capturing of live events?
Working without a storyboard has pitfalls, but with a few simple tips, you’ll be able to better manage the tradeoffs and maximize the rewards to develop your instinctual response to live storytelling.
Preproduction: Research, Hypothesize, Prepare
Know your length and use
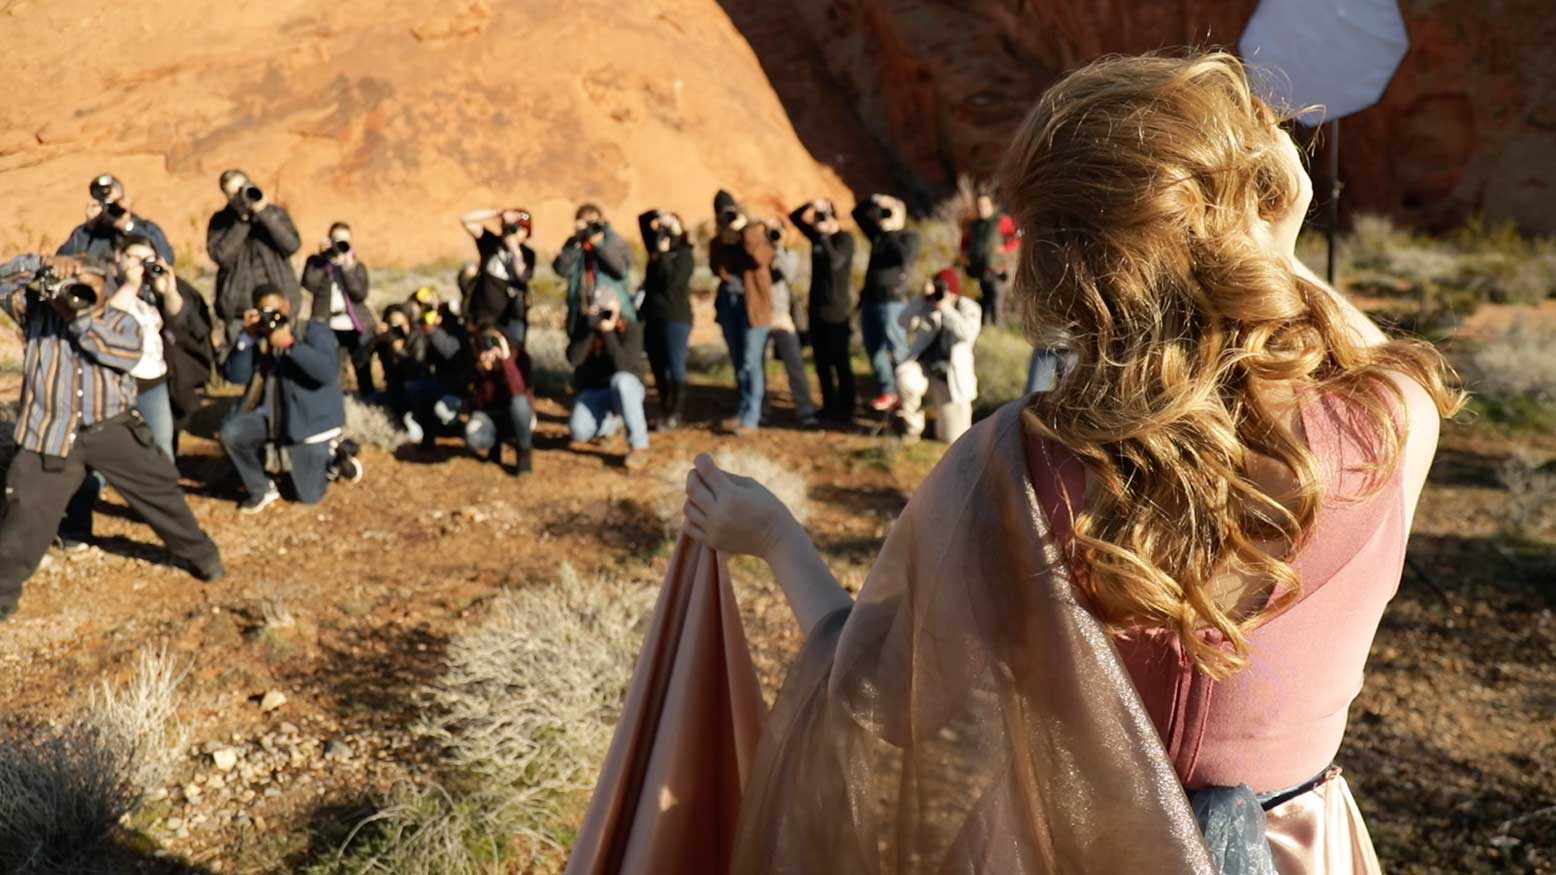
How long do you want the final product to be? Who is the target audience? Where will they watch the video? Why are you creating this? Style guidelines emerge when you add frames to your project. For Project Obscura—the epic, free and totally badass two-day photography conference in Las Vegas sponsored by H&H Color Labs and N-Vu—I created a 90-second video promo spot about the event that appeared on Facebook and YouTube.
Set benchmarks:
Number of Shots
For 90 seconds of video, I worked with a 45-shot benchmark, knowing that a two-second average shot length is a sweet spot for the upbeat post-production style I wanted.
The Anchor Shot
Could you tell your story in a single shot? For Project Obscura, I wanted to showcase the energy of the experience while highlighting the location, models and clothes. I visualized my anchor shot as turning the camera on the photographers in a moving 60fps shot while they clicked away paparazzi style at a model during the hands-on desert workshop.
Choose Gear Wisely
To maximize coverage, it helps to minimize the number of decisions that have to be made.
The new generation of touchscreen auto-focus cameras has been a game changer for DSLR video. I love my Canon 5D Mark iv. Being able to shift focus with a fingertip allows a single camera op to rack focus on a moving shot. No matter your brand preference, once you try the touchscreen autofocus, there is no going back.
For video, I kept it simple with a two-lens setup that gave me combined coverage from 24–200mm. For live shoots, I prefer zoom lenses, which give me more flexibility to grab both close-ups and wider shots without having to switch lenses and miss the action. For Project Obscura, a Canon 24–105 F4 was my main lens for handheld and gimbal shots, and I used a Canon 70–200 f2.8 for close-ups and tripod panning shots.
Recent advances in gimbal technology have led to a paradigm shift for filmmakers. I use a Zhiyun Crane 2 with a monopod extension that allows me to capture reliable, smooth motion at a cost and weight unthinkable even five years ago.
During Production
Assess the Scene
Where is the most compelling action taking place? Do I have enough time to capture the action from multiple angles and/or with multiple focal lengths? Do I need to move now and capture a safe wide? The moments you spend planning and observing will be reflected in the quality of your shot. Don’t overthink it. Stay active.
Shoot for the stars, land on the moon.
I breathe a cautious sigh of relief when I check the back of my camera and see that I’ve hit my target number of shots. Because I also know that simply pressing Record does not guarantee final product footage, I err on the side of overshooting. For the Project Obscura video, I ended up with nearly two hours of video—the me who logged this footage whined, but the me who edited was comforted by the coverage.
Think Like an Editor. Hold Your Shot.
From an editor’s perspective, I can never think of holding a shot for too long. When I am filming, I have the urge to grab and go on to the next thing as soon as I can. How do you reconcile the two? I’ve hit a compromise by singing the refrain of “Celebrate” once I’ve framed my shot. Take a few seconds and sing it now. It may sound silly, but I find it easier to keep time with a song than counting. It’s also great to have a mini celebration every time I frame up a shot I like. The refrain of “Celebrate” is seven seconds long, long enough for me to be grateful for the wiggle room when I sit down to edit. Remember, my average editing sweet spot is a two-second cut. Yours may be longer. You might need to double or triple the refrain. Whatever works.
La variété plaît. Variety, please.
Emphasize variety and create juxtaposition in your shots. Here are five instant ways to serve up a smörgåsbord to your editor.
Camera Movement: One of the simplest ways to vary your visual vocabulary is with different camera movements. Try a combination of these or learn a couple of favorites. Just don’t be too predictable and let your audience get ahead of you.
- Still Shot – no movement
- Tilt – camera angle moves up or down; nod your head “yes”
- Pan – camera angle moves left or right; scan the horizon
- Whip Pan – pan fast enough to blur
- Dolly – camera moving in and out or side to side; think railroad tracks
- Pedestal – camera moving vertically; think elevator
- Zoom – in-lens movement; getting closer
Speed of Motion: How fast or slow is your movement? A slow dolly movement evokes a feeling of tension, like in a horror film. A whip pan is a common technique used for commercial and sitcom transitions. Try getting coverage with multiple options, one shot more steady on your subject and another with a couple of attempts at movement.
Frame Rate: Choose either 24fps or 30fps for your main look, but don’t mix these. Add shots at 60fps to allow for slow motion. I use 60fps when filming on a gimbal for versatility. No matter your frame rate, make sure your shutter speed is roughly double the frame rate in order to capture realistic motion (24fps = 1/50 second, 60fps = 1/125).
Type of Shot: Are you going wide or close-up? Wide shots reveal the location, mediums reveal relationships, close-ups reveal intimate emotions. If you can afford the luxury of shooting the same action with coverage of a wide, medium and close-up, you’ll make your editor happy. This is a great time to use multiple lenses and experiment with variation in angle, depth of focus and focal length if you have time.
Framing: How much of the frame does your subject fill? Where and how much negative space are you allowing? Visualize a still medium wide shot framed with your subject camera left, silhouetted in profile. Cut to a close-up dolly and zoom into their eyes in full light. How does this mental attention to detail inform you? Exercise your visualization muscle.
The research is all around you
Count the number of cuts in the next commercial you see. The average 30-second Super Bowl commercial this year had more than a dozen cuts, and for 60-second spots, some are working with 40 or more. With a pricetag of over $5 million, you can be sure they’ve done their research in consumer response. Look at some common themes; how long are shots held in the edit? Are they close, medium or wide? In what order? How do they juxtapose angles? Hypothesize how you might use a similar cinematography style to tell your story. Work backward to build your awareness. What can you learn from creating a detailed storyboard from an existing video, commercial or film scene you love? How can you apply the lessons to your next shoot?
Working with video can seem like traveling to another dimension. Introducing novel techniques works wonders in improving our cognitive abilities. So you’re not only making art, you’re building gray matter. Now get out there and have fun.


