
Photoshop to Lightroom: How to Turn Custom LUTs Into Color Profiles with Dustin Lucas
When editing in Lightroom and Photoshop, I have presets and actions that make me have to bounce back and forth. From basic sliders for color correction in Lightroom to a more advanced color grading effect with a Gradient Map in Photoshop, I want a simple way to apply more effects in the program I work in. I want to be able to adjust my Lightroom sliders in Photoshop while working on an image. I want to be able to convert an action and apply the same look to an image inside Lightroom without having to translate the sliders into a preset.
Adobe Camera Raw is the solution for nondestructive editing from Lightroom to Photoshop using Smart Objects. This is useful for Lightroom to Photoshop, but what about Photoshop actions into Lightroom? Adobe’s recent improvements give us the ability to create Custom Color Profiles in Camera Raw, so we can flex our creativity with Photoshop actions and Custom Color Profiles by exporting Look Up Tables, or LUTs. This is a massive overhaul for Photoshop that makes our Lightroom workflow even more powerful.
Let’s get started with the basics in Lightroom by trying an Edit in Photoshop as a Smart Object workflow.
Lightroom to Photoshop as a Smart Object
Using the Edit In feature is nothing new to Lightroom, but it is important to note the options you have. If you want to change your sliders while working in Photoshop, choose Open as a Smart Object in Photoshop. This immediately opens your edit into Photoshop, and at any point during editing, you can double-click the image layer to adjust your sliders. This is useful as you apply actions to your edit and make quick tweaks to exposure, highlights, clarity, etc. These changes made in Camera Raw do not save back into Lightroom since you are no longer working on a Raw file, and there are limitations to editing in Photoshop with Smart Objects when doing heavy lifting.
Pixel manipulation like the Clone Stamp and Healing Brush won’t work. You’d have to create a blank layer and change your Sample setting to current and below. When you make this type of change, you will have to ditch your nondestructive abilities since any future changes to the Smart Object would not apply to blank layers like this. That is why the Clone & Heal tool inside Lightroom can be great for editing. One additional benefit to Smart Objects is that it has Smart Filters offering another nondestructive way to apply plugins like Portraiture.
Why would that be beneficial? Just as we wanted the ability to adjust Lightroom sliders while in Photoshop with Smart Object layers, you can reopen third-party plugins like Portraiture to tweak settings. The same goes for other filters like Liquify when you are doing some body shaping. Once you are done in Photoshop, save your copy and the edited file will update in Lightroom. If you want to continue editing this image later in Photoshop, retaining your layers, you will have to open it directly in Photoshop rather than use the Edit In technique.
Now that we’ve gone from Lightroom to Photoshop, let’s explore how to convert actions to color profiles by exporting LUTs.
Exporting Custom LUTs From Photoshop
Before we get started, we need to be sure our actions contain only adjustment layers; image layers will not export as a LUT. Find the layer adjustments at the bottom of your Layers palette by clicking the middle icon. If you don’t have an action built, don’t worry—we can apply a few adjustments to get started. One of my favorite tools is the Gradient Map for converting to black and white and as a quick way to color-grade. If you haven’t used this tool before, add it to your list.
After adding a Gradient Map, you’ll see that your image looks more like a negative. This is simple to fix: Click the Reverse button so your gradient reads more like a standard histogram: The left side is black gradually shifting to the right to make white. If you want to keep the image in color, change the Blend Mode to Luminosity, which keeps the tones and reverts back from a monochromatic image. The same goes for the Black & White: Apply this to your image to quickly shift the luminosity of specific colors. Once you have a few layer adjustments applied, you are ready to export as a LUT.
To export, go to File in the top menu bar, hover the cursor over Export and click Color Lookup Tables. You will need to rasterize your base layer to complete these next steps. You cannot work from a Smart Object layer when exporting LUTs. When exporting, I leave everything at the default settings in the popup dialog box. You can add a description, copyright, adjust quality to high and uncheck formats as you see fit. I will need only a .cube file for Adobe Camera Raw, so I’ll select that option to reduce file clutter. On the next screen, name the file and store it for later use. Now we are ready to jump into Camera Raw. Before we do, let’s convert our Background layer back to a Smart Object—just right-click on the layer and convert. This lets us go back to our adjustment sliders later.
Working With Custom Color Profiles
Now that we have our LUT saved from Photoshop, open Camera Raw and save it as a Custom Color Profile. Navigate to the Presets panel. Just as we have done when creating a Custom Color Profile from our slider adjustments, we hold the Option/Alt key and click the Create Preset button at the bottom of the panel. This opens the New Profile dialog box, where we can choose a name and storage location in the Color Profile section. I leave the Tone Map Strength at Low (Normal) and check the box next to Color Lookup Table. Now I can locate that .cube file we created earlier and click OK. We are ready to apply this in Camera Raw and Lightroom.
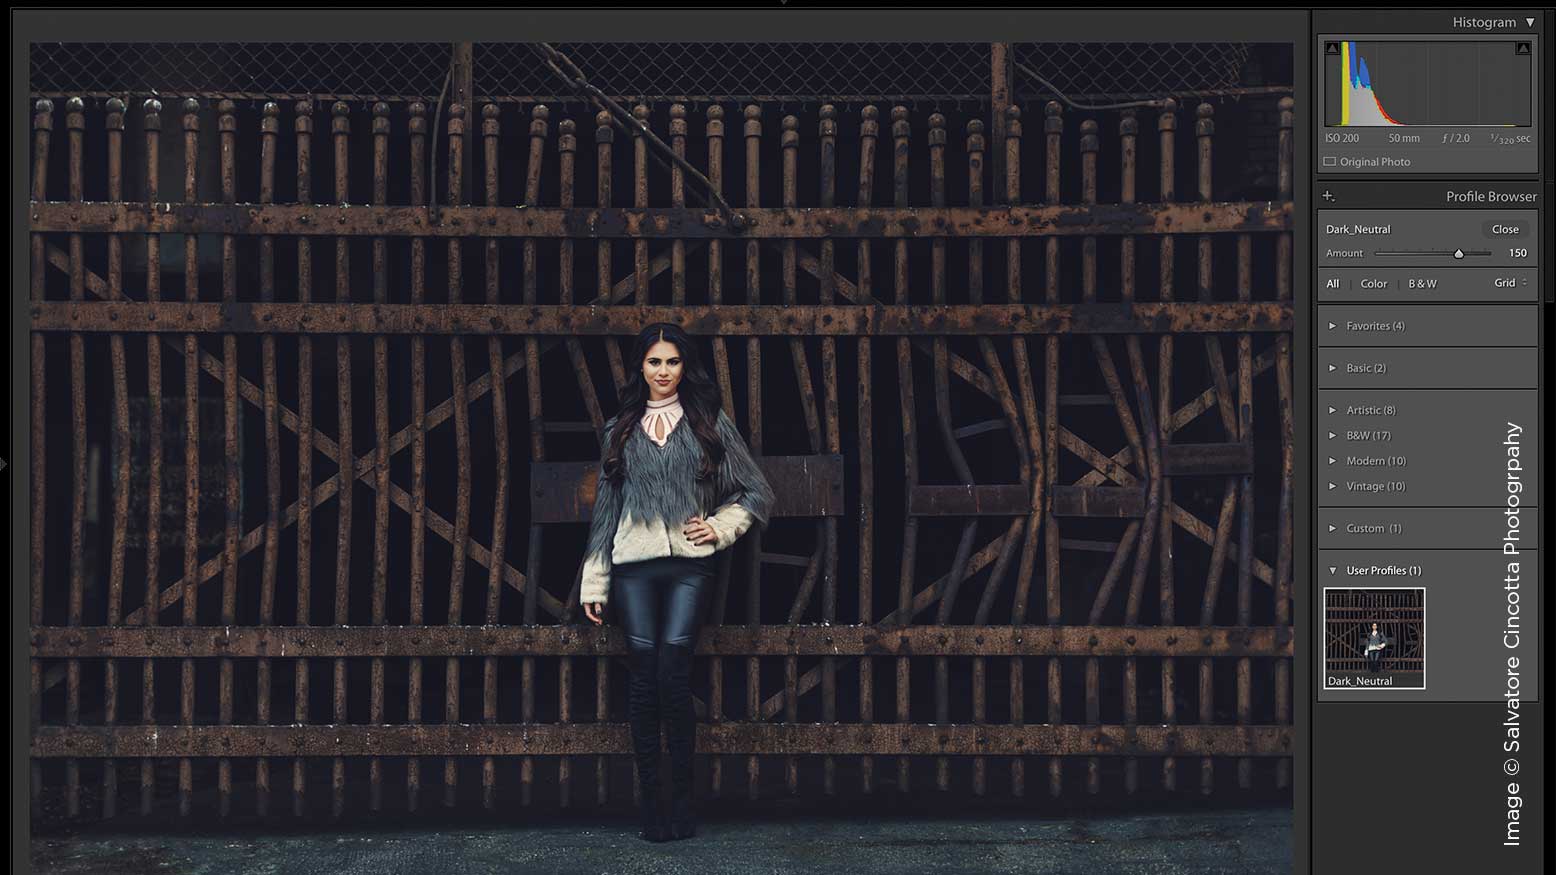
If you have Lightroom open while creating a new profile, you will need to relaunch it to select it. Find your profile at the top of the Basic Panel in Lightroom Classic version 8.1. Find the set you saved it in and click the profile. What’s awesome about using custom profiles is the addition of an Amount slider that allows you to lower or raise this effect. This starts at 100%, and you can drop down to 0 or lift to 200. Now you can apply your creativity directly in Lightroom and keep things organized in one place. This is a game-changer for my workflow.
The Results
That is it. You are ready to start exporting more LUTs, creating profiles and adding them to images in Lightroom to flex your creativity. Those Lightroom users who don’t have a bunch of prebuilt actions to convert should explore tools in Photoshop not available in Lightroom, like Gradient Map and Color Balance for adjusting highlights, midtones and shadows separately. I work in both programs using Open as Smart Object when going into Photoshop. When I want to batch-apply creative effects for a down-and-dirty edit, custom profiles are the way to go. There’s no reason to run a time-intensive batch process in Photoshop. Add this to your workflow, and you won’t be disappointed.


