
Posing Tips For Powerful Boudoir Images with Lori Poole
Posing Rules 1.0
We’ve all heard the basic posing rules for portraiture: the S Curve, the C curve, the I pose, the blade of the hand, pushing the hips away from the camera, and turning the body three-quarters instead of photographing straight on. These are all great posing techniques, and these rules exist for a reason. Posing rules are designed to help you flatter your portrait clients when converting their three-dimensional selves to a two-dimensional medium. If you haven’t heard of the rules I just listed, definitely invest some time into learning them.
Posing Rules 2.0: The Boudoir Edition
In my experience, boudoir photography adds a whole new set of rules. Why? First, the nature of boudoir photography often means that neither you nor your clients can rely on savvy wardrobe choices to help flatter problem areas. When a client is dressed in lingerie, little can be hidden. Second, many boudoir clients are seeking a boudoir experience to change how they view themselves and how they feel about their so-called problem areas. As a broad generalization, women want to see how their unique bodies (which may or may not adhere to traditional beauty standards) can be seen as beautiful, sexy and desirable. This means that as boudoir photographers, we work with clients in little or no clothing and must use careful posing and lighting to highlight their best features and prove to them that they are, in fact, beautiful.
I’m not going to give you 10 poses to memorize, or give you different posing ideas for different body types. While these kinds of tips are certainly helpful in expanding your posing repertoire, they don’t help you understand how to flatter the female body. Instead, I’m going to give you my favorite posing tweaks to help you learn to think critically about ways to make any body look longer, curvier, and more feminine.
When I’m about to pose a client, my thought process includes asking myself the following questions:
- What is the general concept of the pose?
- What are the legs doing?
- What are the hands doing?
- Is the back arched?
- Where is the head pointed?
- What is the facial expression I want to see?
I coach my client through the answers to those questions sequentially to create a dynamic and flattering pose. Read on to discover the little tweaks I use throughout each step to bring the pose to life.
Tip 1. Pose Concept – Be Literal
At the heart of boudoir, we are trying to create flattering and beautiful images of someone’s body. This is different than most portraiture, where the face is the most important element. That means that we need to have a concept for what the body is doing, or what body part we want to feature. The most successful pose starts with a clear vision. This means you, the photographer, need to control every aspect of the pose.
Think literal. Start with, “Is she sitting, lying down, or standing?” Don’t start with, “I envision her being seductive on the bed.” What does that even mean? If you do not have concrete details in your head, you will struggle to direct your client or bring the image together. Other items to consider: Is this a portrait of her whole self, or are you highlighting a specific body part? Consider how lighting will interact with the pose. Is the light skimming across her body to show musculature or contour? Or is the light flooding through the image to hide surface texture like cellulite or wrinkles? Once you have your general concept ready, you can work through refining the pose by using the tweaks below.
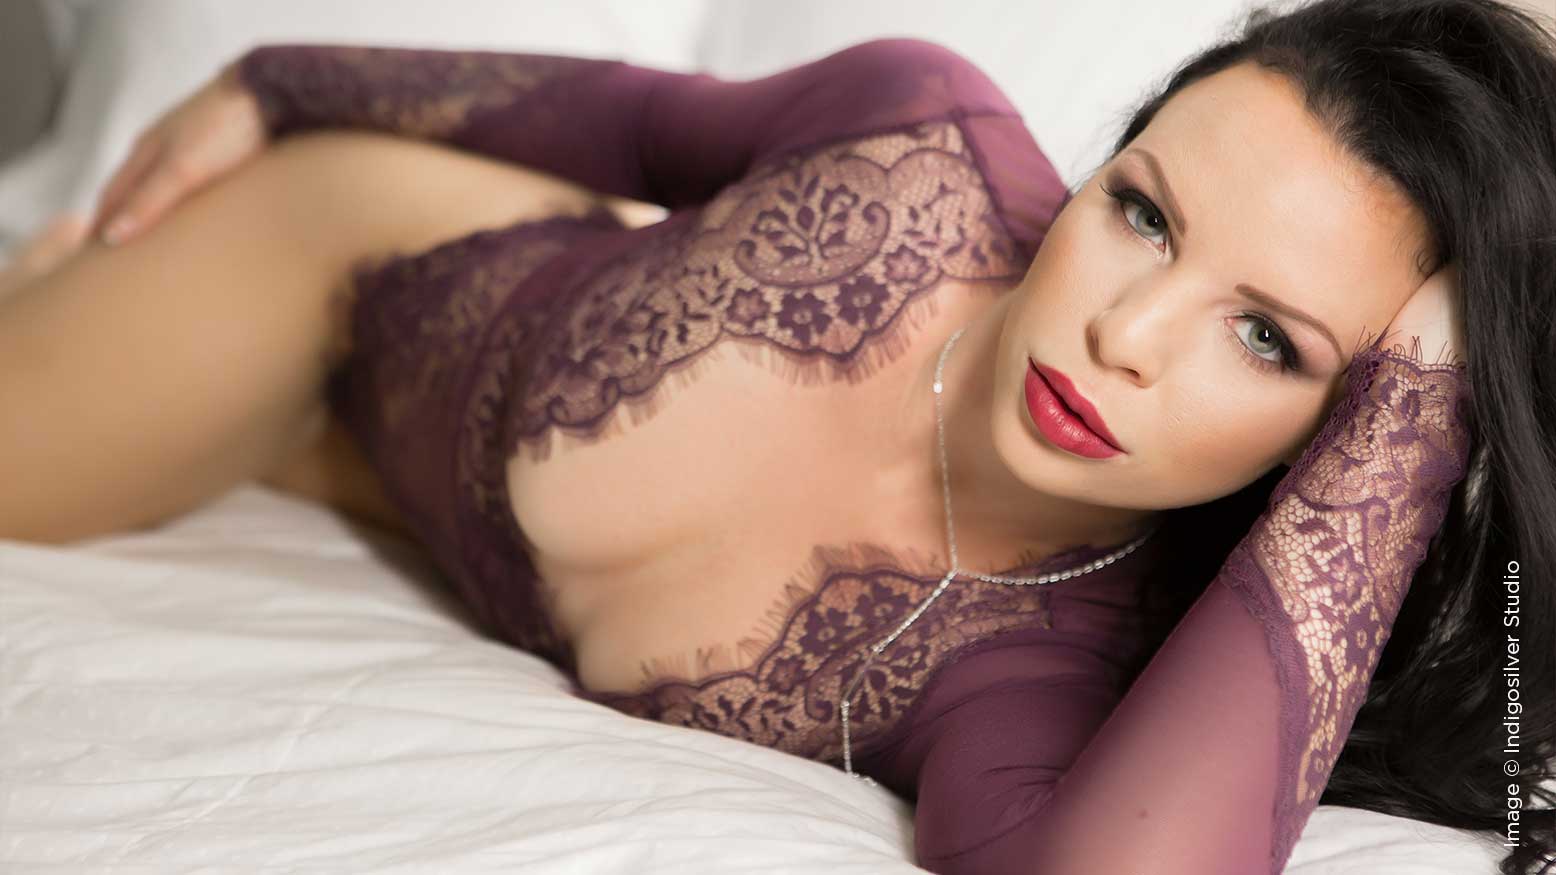
Tip 2. Legs – Elongate
Many boudoir images can be quickly improved by some quick tweaks to elongate the legs. By keeping legs elongated, we are maintaining proper leg-to-torso proportions, which helps prevent the client from looking squatty. To elongate the legs, first make sure the legs are not overly bent, shortening the distance between the feet and the torso. However, we don’t want straight legs either. The old adage of “If it bends, bend it” still applies.
Once you find the sweet spot of “not too bent, not too straight” for the legs, your next step will be to point the toes. Pointing the toes adds an additional six inches or so of length to the leg. It also engages the calf muscles, which help create a more shapely leg. Finally, the toe point creates more energy to the pose so that it does not feel flat and lifeless.
Tip 3. Hands – Give Them a Task
In most poses, the pose will look the most natural if the hands are given a task to do. Keep it simple. Run her fingers through her hair. Trail her hands over a body part—leg, bust, neck. Tug on a bra strap. Push the underwear down. Hand on hip. Fingermouthing (yes, this is a real term). As with all portraiture, mind your basic rules: wrist bent, fingers relaxed, no doll hands, no claws.
Tip 4. Back – Arch That Back
With very few exceptions, nearly every boudoir pose involves arching the back to create a pleasing curve through the torso. Arching the back is the quintessential tweak that brings a pose to life. This exaggeration of posture changes a pose from flat and static to dynamic.
A proper arch helps create the illusion of an hourglass figure. Arching lifts and enhances the bustline, tightens the waist, and pushes the hips back. Pushing the hips back creates a better curve on the outside of the hip and makes the booty rounder and fuller. The same pose without arching the back creates a silhouette that is boxes and shapeless, and the image itself will often lack vibrancy and life.
Back arching is not just for standing or upright poses—my clients are instructed on various ways to arch, whether they are standing, sitting, kneeling, lying on their back, or lying on their stomach.
Tip 5. Head – Elongate the Neck
My first consideration for head placement always involves lighting. Short light is my favorite facial lighting, which means I am almost always directing my client’s face toward the light. Beyond that, I am looking for ways to elongate the neck and slim the jawline. Coach your client to jut her chin forward to lengthen and define. I also make sure that when she arches her back, she doesn’t shrug her shoulders up. The shoulders are pushed back down to keep the neck long.
If your client is lying down, have her lift her chin upward. One, it keeps her from tucking her chin and creating an unsightly jawline. Two, it elongates the neck. Three, it tends to enhance the silhouette created by the back arch. This rule is especially important if you are shooting from an angle at the top of your client’s head. Rather than shooting the top of her head, have her lift her chin up to get more of her face.
Tip 6. Expression – Be Literal (Again)
When I tell my clients that they do not have to practice facial expressions before their shoots, it comes as a huge relief! Instead, I coach each client through very literal and concrete instructions on what to do with her facial features. I may have her look down with her eyes and part her lips. If she’s struggling with having a relaxed mouth, I will coach her to take a deep breath in and out. I make sure she isn’t pursing or duck-lipping. Alternatively, I may have her look directly into the lens and smile. If her smile falls flat, I encourage her to smile bigger … bigger … c’mon girl, bigger! Usually, at that point, she will smile naturally or laugh.
Be careful not to direct your client to “be sexy,” “flirt with the camera,” or “think about your boyfriend.” For one thing, most people are not professional actors, and they do not know how to portray these emotions on command. Second, it’s a bit heteronormative and presumptuous to assume that all women have boyfriends, are interested in men, and/or are trying to portray their sexuality through their images. Instead, use more literal posing direction.
Expression is always the last step in the process. Natural expressions are often fleeting, and can become forced quickly if held for too long.
Put It All Together for Maximum Impact
The easiest way to coach a pose is to demonstrate it yourself, while talking through what you are doing. That might sound something like this: “OK Lindsay, we’re going to start by lying across the bed, like this. With your legs, you’re going to have them bent here and here, and you’re going to point your toes like this. Your hands are going to go there and there. Make sure they’re just a little bent, and keep your fingers relaxed but not too straight. Then you’re going to arch your back by lifting your chest up like this. Chin way, way up, eyes down, lips parted. Now you try.” Notice how I basically walked through the framework created by the six questions asked earlier in the article, and refined using the six tweaks outlined herein.
Before getting your client into a complex pose, make sure your lighting and camera settings are ready. Many of these poses are uncomfortable to hold for longer than a few seconds.
As your client attempts the pose, walk her through the same framework: basic pose, legs, hands, arch, head, expression. At each step, affirm that she has done it correctly—a simple “yes” or “good” goes a long way to reassure your client throughout a very foreign-feeling pose. At the completion of the final step—the expression—you’re ready to click the shutter for an image that wows!


