
The Versatility of a Gray Backdrop with Jess Hess
Backdrops usually aren’t cheap. Good ones definitely aren’t. The costs can really go uphill if you’re adding several colors and styles to your arsenal. You’re gonna need something dark, and something bright! Maybe something with a floral pattern, and of course one with an old masters pattern. And you’d add the pink one too if you didn’t just spend your whole paycheck on the four before it. You’ve also got to do some major organizing to make space for all your new stuff. For folks on a budget or with limited space, having a variety might not be doable. Thankfully, you can satisfy many of your desires with just onebackdrop.
Gray backdrops are the often-overlooked top dog of the background world, and they become heavyweight champs when you use gray seamless paper. Regardless of brand, seamless paper in any color provides a smooth, even, non-reflective surface on which to shoot. Seamless paper looks glorious in camera and cuts editing time in half. No wrinkles like in many fabrics, and no uneven background lighting due to those wrinkles. Seamless paper comes in a variety of colors too, pretty much any shade you can think of. It is sold on rolls at varying widths, so you can have something compact for a small in-home studio or something wide for shooting entire families. Being sold on rolls is also terrific because getting rid of old, crinkled, or dirty paper is as simple as cutting it off. Most of you probably aren’t new to the world of seamless paper, but if you are, I suggest treating yourself and picking up a roll.
Now, we are talking about gray backdrops specifically. Say you have a client who wants you to photograph her two children. She wants them photographed separately with plain, monotone backgrounds. She wants one on a solid white backdrop and the other on a solid black one. Easy enough, but if you haven’t got one or the other (or either) you’re likely going to look into purchasing them for your session. Buying a backdrop or two significantly cuts into profits too, which is never fun. With a gray seamless backdrop, you have both of those options available to you already.
Simply put, a gray background (or any background) is going to look different depending on how much light is hitting it, and the direction in which it’s hit. By illuminating the backdrop brighter than your subject, and using settings that keep the subject exposed while leaving the background overexposed, you are going to get a white background. Do the opposite, and keep light off the background and the background underexposed, and it’s going to appear dark. You can certainly have darker or lighter colored backdrops by controlling the lighting in the same way, but gray is more valuable because being desaturated makes blacks and whites achievable and allows you to add colors easily in post. Remember, many shades of gray do have warm or cool undertones, but it’s usually not a big deal because the slight correction takes mere seconds in Photoshop. However, no undertones are certainly best. I prefer Savage brand Thunder Gray, Storm Gray, and Fashion Gray.
Turning the Backdrop White
To turn a backdrop white, what I typically do is set up one or two speedlights in the background, aimed directly at the backdrop behind my subject. I more often than not keep those speedlights at full power. In the foreground, I set up the light however I want it. I expose for the subject and foreground light, allowing the background to become way overexposed. Usually this results in a pure white backdrop. Depending on your settings and light, sometimes there may be slight dark spots along the edges, but that’s no problem at all to take care of in post. Usually just playing around with your settings will yield you the results you want.
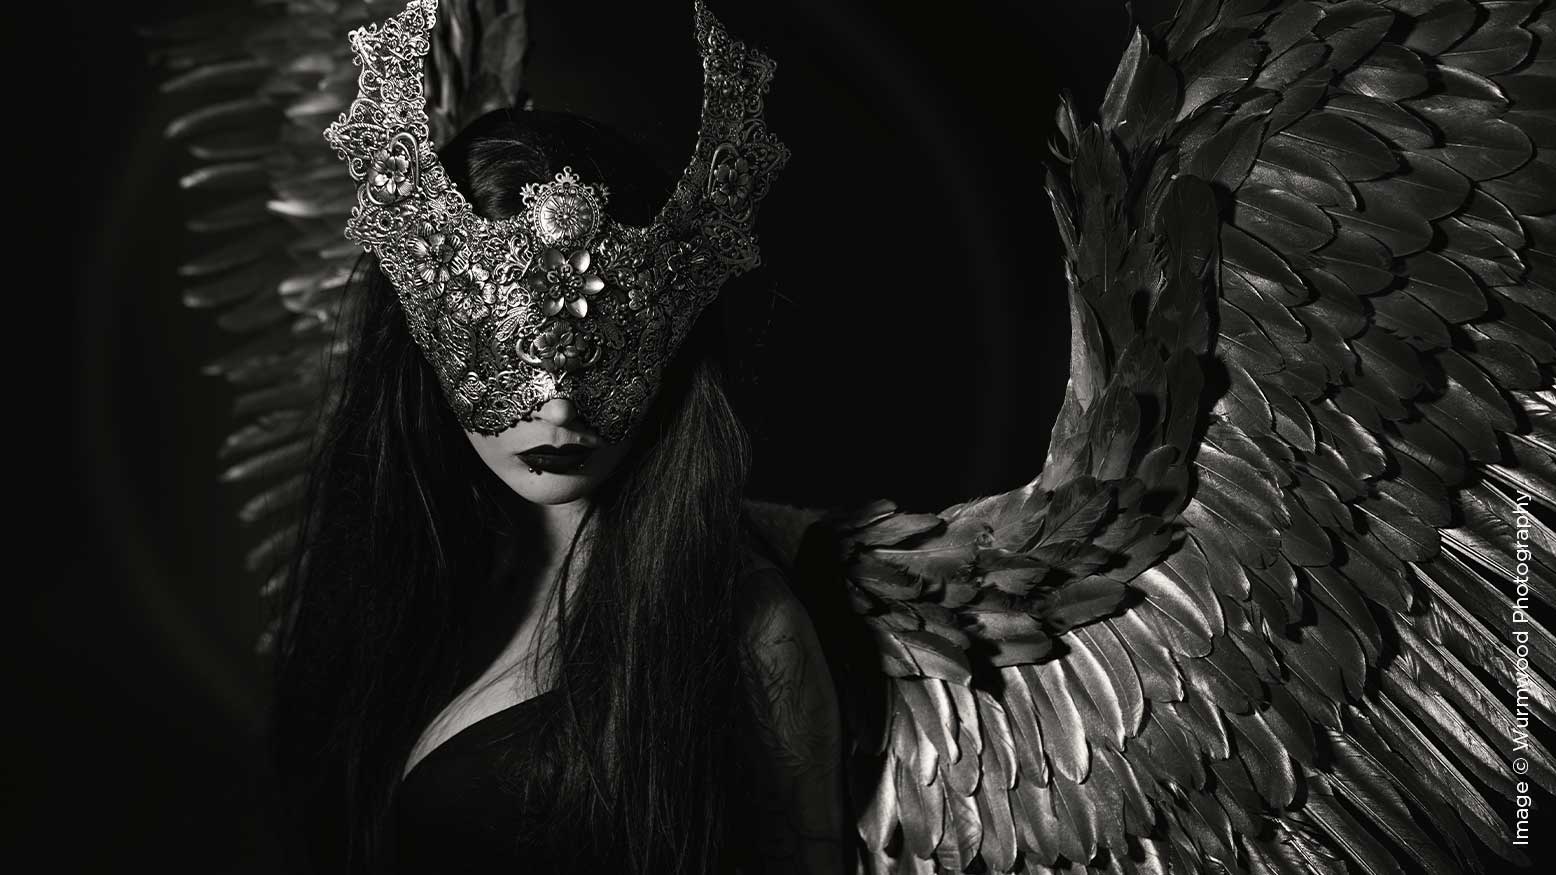
Turning the Backdrop Black
To turn a backdrop black, we must remove all light from the backdrop. Now my background lights are completely off, and I am only shooting in the foreground. To achieve a pure black background, you have to ensure that all light is kept from hitting the backdrop. If you are shooting on a slow shutter speed you’ll need to beware of ambient light coming from lamps or windows. With a faster shutter speed, ambient light is usually no issue. My studio is practically made of windows and I’ve managed to shoot with pure black backgrounds simply by shooting really fast. If you are shooting with continuous light and need a slow shutter speed, you can block off windows and shut off lamps. You can also use a black card (I use black poster board from Walmart for $2) and attach it to the side of your lightbox closest to the backdrop. This works as a “barn door” and directs the light at the subject and away from the backdrop. For a foreground light, angle it to the side as not to have any spill onto the backdrop. You can also use or make barn doors for the key light, or you can shoot with a grid to focus the light directionally and keep it off of the backdrop.
It’s also fun to play around with the position of your key light. If you want a little bit of luminance in the backdrop, try moving your light and/or removing the grid. Or, try changing your camera and key light settings to bring up the exposure on the backdrop while keeping the exposure correct on the subject. Or, of course, you can add background lights aimed directly at the backdrop.
It’s incredibly easy to play around with your light to create shadows, depth, and moods. You can shoot so many different looks in a short time with ease.
Let’s jump back to that imaginary client. She shows up for you to photograph her children. Upon arrival, however, she wonders if she can change her background color selections to blue and green. A stark difference from the black and white you had planned for. If you purchased new backgrounds, you’re not in a good position. If you’ve got your gray background and some gels, you’re all set. For this, we’re going to use the same setup we would use to get a white backdrop, except we are going to use colored gels on our lights. With a monolight or two aimed at the background, you’re going to get a better color across the backdrop than with small or not-so-powerful lights. I use one or two speedlights, which aren’t always powerful enough to be perfect, but definitely powerful enough to get the shot I need.
Pro Tip: Remember that as long as you have the correct color behind the hair, the rest is easy to edit in post. Concentrate as much of that colored light as you can on the area directly behind the subject’s head. With gels, the 50% gray really picks up color better than other shades.
As stated previously, if the color doesn’t stretch to the edges of your image you can do a little Photoshop magic to tidy it up. Or, you may like the light fall-off, which I definitely do. The following images were all shot on the same gray backdrop.
Want to get extra creative with it? Add a pattern or texture. More often than not when adding a texture or pattern to a backdrop, I create or upload the texture or pattern onto a new layer. I then mess with the opacity and possibly add some field blur if it’s a pattern that looks too “sharp” to look realistic. Then I change that layer’s blend mode to “soft light,” create a layer mask, and paint black onto the layer mask over the subject to remove the backdrop from them. I’ve found you can barely see some textures over the subject which makes removing them a breeze. Some other textures require a little more time and care when masking them out.
If you want pastel colors that are hard to achieve with gels, another option is to just shoot the gray as gray and light it evenly, then paint a color on a new layer over the backdrop. Lots of blending modes work with this, depending on the look you want. Color, Multiply, and Vivid Light are the blend modes I use most often. You can paint it on haphazardly then add a layer mask and mask out what shouldn’t show.
Another tip when masking (especially around hair) is to remember your brush opacity. If you can’t be exact with the background and hairline, it shows. It helps to change the brush opacity to 20%, zoom in closely, and paint over the hair with multiple strokes, going over large patches of hair a higher number of times. The lower opacity helps to blend the two layers better because it only masks a little bit at a time, which gives you way more control and makes things look more presentable.
Want to get even more creative? Add multiple layers of color or texture, or swap out the background entirely! With no color cast, masking out the background is usually quite simple and I prefer it to a green screen.
With patience and trial and error you can master the gray backdrop and use it to its full potential. Conquering the gray backdrop will save you time, money, and precious studio space. By experimenting with different lighting setups and editing techniques, there’s absolutely no limit to what you can create, and it makes creativity and options on a budget possible.


