
5 Steps to Brush Up on Retouching in Photoshop with Dustin Lucas
As photographers, you should focus on making your client look their best, but do not transform them into someone they won’t recognize. The rule of thumb with retouching is to be subtle enough that it’s not even noticeable that you did it. For this level of editing, I find myself starting in Lightroom or another RAW processing program, then retouching in Photoshop. In my opinion, there is no other comparable tool, and with actions, using a tablet for pressure sensitivity, and using a non-destructive post-production workflow, I can run through multiple images with ease. So if you need to dust off your editing skills, these are the five steps to brush up on retouching in Photoshop.
It all starts with a light dose of editing for color correction in Lightroom to make sure I have a solid base. Once I export my files into Photoshop, I start with the pixel manipulation to remove blemishes and distracting hairs. Then I am ready to accentuate the eyes, lips and teeth. Once we apply some Liquify, we can soften the skin while bringing back some sharpness to focus on the features of the face. Last but not least, it’s dodge and burn to the rescue to get the image ready to show to the client.
1. Prepping Your File
Working from a RAW file, I typically use Lightroom, since it’s a lot faster than opening it directly into Camera Raw. Quickly, I can set my white balance and exposure—keep in mind we will use Photoshop later for most of the heavy lifting for toning. One important setting is profile, as this will make sure the correct color is applied to the image. Typically, I leave this at Adobe Color unless I am applying a creative look. Next, I use lens correction to fix mostly the vignette and any distortion with the lens. Most importantly, I have to consider export options when rasterizing my RAW file.
I usually set the file type to .tiff and the bit depth to 16 bits/component to get the most out of my image when editing in Photoshop. Color space is important as well, and when I need to do further work I use Adobe 1998 (RGB). Only if I am ready to post or deliver will I convert to sRGB. Once I have my file open, it’s very important that I prepare to work non-destructively. Always work from new or duplicated image layers to ensure you can go back and correct any mistakes. The last thing you want to do is make a mistake and have to start all over. It’s simple to do, just hold option and command while striking the “j” key.
2. Heal Your Blemishes, Stray Hairs and Crosshairs
Healing brush is by far the best tool for fixing a majority of issues tied to skin blemishes, skin flakes, stray hairs and crosshairs. You will definitely want to know what type of settings to use in different situations, like for feathering, diffusion and sampling. Focusing on skin blemishes and flakes, we will need to adjust the feathering for a softer edge and set diffusion to 5. Striking the “j” key will open the healing brush tool, but be sure you don’t grab the spot brush, because this doesn’t let you sample. Before you start healing the skin, you will need to create a new layer, then hold shift and command while striking the “n” key. We can name this layer “Skin” and start removing blemishes. One last tip would be to check the aligned box so that when you sample, it moves with your cursor versus picking from the same spot repeatedly. It’s all in those details where you want to focus on this type of cleanup.
Removing stray hairs takes a very similar approach as with blemishes. You will have a softer brush, so it blends in with the background. The clone brush can be used as well when you start to get smudges from the healing brush. You can blend the two and maintain the integrity of the image. In this case, once I am finished working around the bride’s head, I can move to the hairs on the forehead. This is where I change the brush to a harder edge and lower the diffusion to 1. This will reduce the smudging effect and keep the texture of the skin intact. You can follow close with the sample and fix these hairs quite quickly.
3. Brush Up Eyes, Lips and Teeth
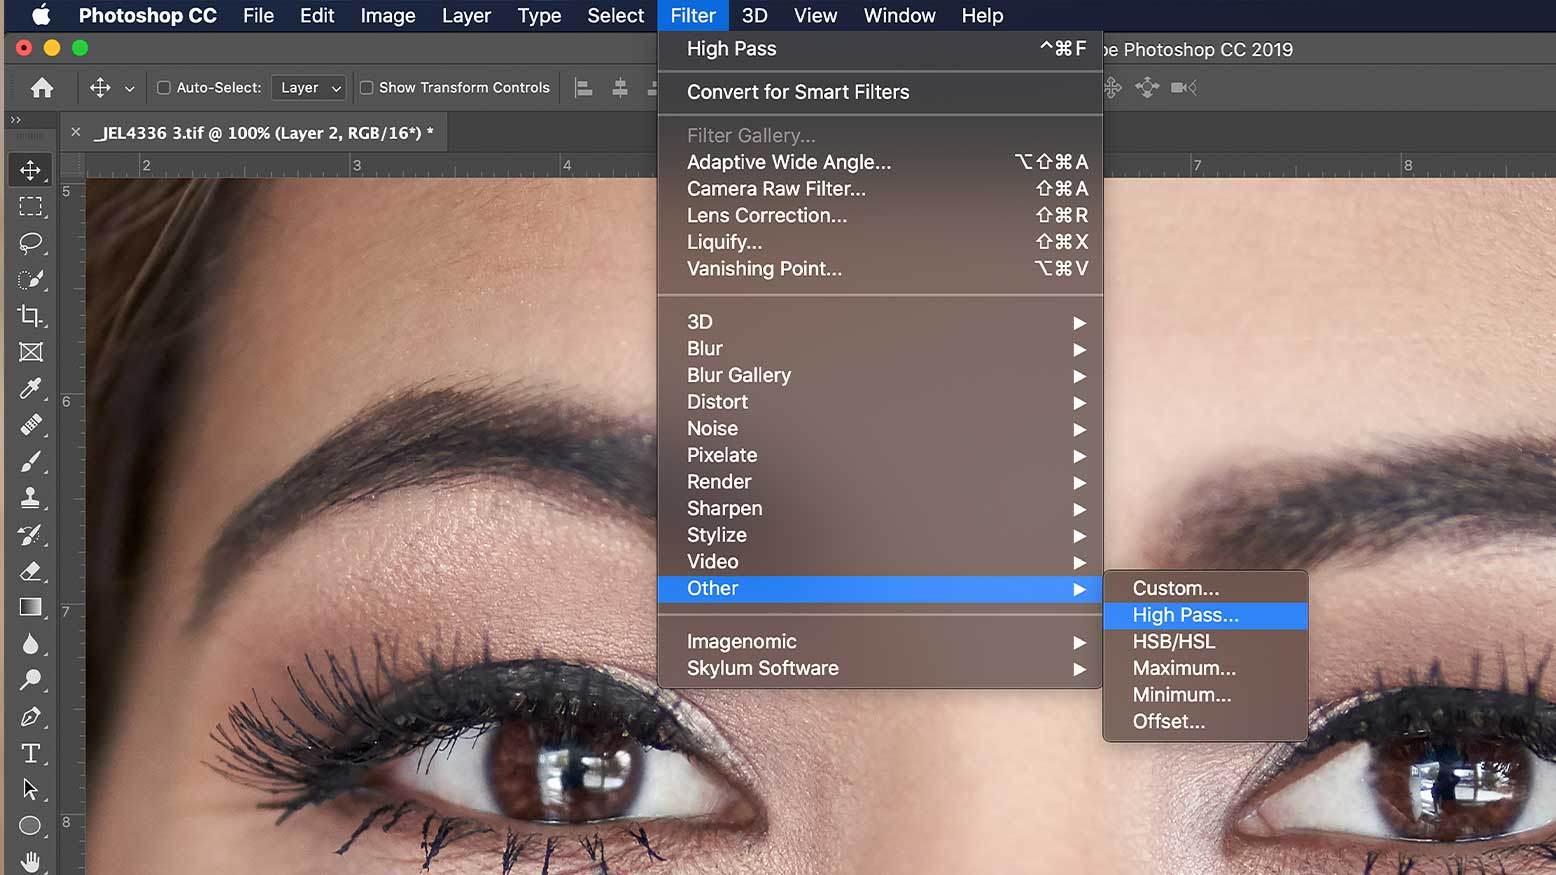
Moving on to the eyes, we can see this is not the best image to demonstrate eye work, but we can still clean up veins and globs of mascara. Typically, I would start with a curves layer, adjust the image to be very bright, and invert the layer mask to paint in some dramatic effects. To remove the veins, this is a similar process as we used the healing brush for, with a hard edge and lower diffusion. Also, if I want to add some sharpness to the camera left eye, I can do so with some high pass sharpening.
Start by adding a new action, naming it “High Pass,” and then clicking record. I highly recommend for useful tools to always create actions to make editing faster. Now create a new image layer, click on Filter in the top menu, choose Other>High Pass, and set the radius to 10 pixels. Then we can double click the new layer to open Layer Styles, set Opacity to 75% and Mode to Hard Light, and click OK. Then name the layer “High Pass,” and hold option while clicking Add Layer Mask to invert it and stop recording. Now you can take the brush tool, set the foreground color to black and white by striking the “d” key, and then strike “x” to bring white to the foreground. Paint with the white brush on the inverted later mask at 100% to apply the effect to the left eye. Once you are done, you can toggle the “\” key to see where you’ve painted and adjust the layer opacity as needed. Now to finish off the eyes, we can group all layers and name this “Eyes” for organization.
Moving on to the lips, we need to clean up the lipstick and boost the saturation. I typically start by selecting around the lips with the pen tool. Then we can right click, leave feather at 0, and click OK. To see our mask, we can strike the “q” key and add a gaussian blur to soften the edge. This is a little trick to see the mask edge so we can clean up around the lips with the healing brush. Before we get started, we need to save a path to use later as well.
With the lips selected, add a new blank layer, invert the selection, and use the clone brush around the lips to better define their shape. After that, we can invert the selection again, add a new layer, and clone the inside edge of the selection. Once you are done, select both layers and reduce opacity to make this look realistic. Now we can add a Hue/Saturation adjustment layer to help with the right side color. Also, to fix smeared and chapped lips, we can simply clone to fill in these areas. Let’s move on to a quick teeth-whitening technique.
This part is simple—choose the lasso tool, and draw around teeth to make a selection. Once selected, add a Hue/Saturation adjustment layer. Click on Master to choose Yellows to specifically target these colors. Then lower saturation to -80 and lift lightness to +25. That’s it, and now we are ready to move into a simple Liquify.
4. Simple Liquify, Soften Skin and Sharpen Features
When it comes to Liquify, I tend to only do light changes to correct for lens distortion or if they are requested specifically. To start, I create a smash layer by holding shift, option, and command, and striking the “e” key. This smashes all layers into one new one, which I name “Liquify.” Before I jump into Liquify, I make this a Smart Layer so it’s non-destructive. Then I can go to Filter in the top menu bar and choose Liquify. I really like the Face-Aware tool for quickly reshaping facial features. Mainly, I mess with the lips and the jawline, but overall this needs to be used with caution. Retouching should not transform the person to the point they don’t recognize themselves.
Now we are ready to soften the skin, and I gotta say Portraiture is still the faster option to use. I have an action set up already that creates a smash layer, applies a standard amount of smoothing, inverts a layer mask, and sets opacity to 75%. This is all I need to then paint on the smoothing and adjust the opacity as needed. Then I apply my High Pass action to sharpen and bring back details. These three steps really elevate this beauty portrait, and my bride will be happy.
5. Dodge and Burn
When it comes to the final output for my image, I want the dodge and burn technique to be subtle, but to direct the viewer to the eyes and accentuate the bride’s features. Having actions for these makes life way easier, but making a dodge layer is simple. First, add a curves adjustment layer, and lift the curve to brighten the image. Then, hold option while clicking as a layer mask to invert the mask. Do the same thing for burn, except lower the curve to darken. I also like to create a white recovery curve, dropping the upper right point to flatten the white point. This helps with blown highlights.
The goal here is to highlight the cheek bones and lighten any shadows under the eyes. Then, we can either burn in the hot spots or use a painting technique to add color tones from the skin. To do this, select the eyedropper tool by striking the “i” key, and set the Sample Size to 5×5 so it grabs a larger average when sampling. Then, strike the “b” key to bring up the brush tool, and hold option, click, and sample skin tones you want to paint. Then set the brush opacity to 5% and start layering up to cover hotspots. This works so much better than the burn tool, which will take the color out and turn things grey.
The Results
There are definitely more than five steps here, but I think you get the point about how to brush up on your retouching skills. Now, I was working a little out of order. You would likely want to do all removals, skin smoothing, and Liquify first so you don’t have to make multiple smash layers, losing the ability to go backward. You want to work fast, but also not waste a bunch of time if you have to fix a hair you remove improperly. This is definitely a good base to start from, and hopefully you grabbed a few new tips for editing. A lot of what I do is built on actions with masks inverted along with being subtle with my beauty touchups. Brush up on your beauty retouching in Photoshop, and offer professional imagery to your client.


