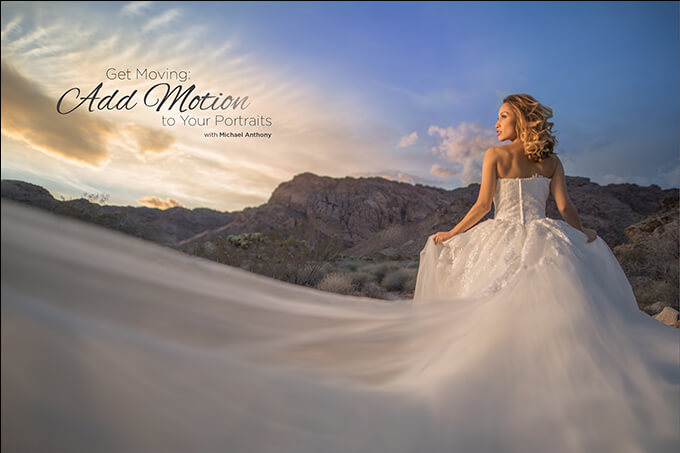
Get Moving: Add Motion to Your Portraits with Michael Anthony
Want more information on this article? Get access to video content and additional supporting images. Launch the April issue of the magazine by logging in or signing up for a free account by clicking here. Shutter Magazine is the industry’s leading professional photography magazine.
Posing is a tough subject for photographers. The problem is that a set of poses that works for one bride will not necessarily work for another. As professionals, we are supposed to look through the camera and determine the best look for the individual we are photographing.
The majority of people you photograph are probably not used to being in front of a camera. They are stiff and awkward, and their expressions look contrived and forced without proper coaching. You can work them into a more natural position, work their expression based on the basic foundations I laid out in my March and April 2016 articles in Shutter Magazine to get your basic and posed images out of the way.
I have found in the last year that every image that has a story tends to sell better emotionally to the viewer. Static subjects could work for your basic and dramatic images. But one way I have found to add interest to almost any basic image is to add motion to your poses.
You can do this two ways. The first is to put your subject in motion. This is by far the most effective way to get believable results. The second way is to pose your subjects static, but so they look like they are in motion. This method is much harder to achieve, and should only be used when option one won’t work because you are in low light or your subject is somewhere where movement might inhibit the pose. There are a few other scenarios where this method works well, which we will get to later.
Get in Motion
Some photographers teach “flow posing,” which is to create a series of poses out of a single pose while transitioning from one pose to the next. That is different from what we are talking about. Motion posing means to photograph a series of images from a movement that your clients are doing. Let’s look at an example here.
This is a simple motion pose we use often. I have a couple walk away from me or toward me. I instruct them to look at each other and smile. While they are walking, I tell the groom to twirl the bride around like they are dancing. They do this correct 99 percent of the time. Meanwhile, I am shooting in continuous mode and capturing all the motion. Not every image in the series will be a winner, but you will always have enough to tell the story.
Simple motion like this allows for several things. First, it increases the number of proofs to deliver to your clients. Second, it helps capture genuine emotion. Lastly, it requires more than a single image to tell the story, which helps you drive album sales or multiple prints. It is important to educate them during the sales session that these images are meant to be displayed together. Remember, emotion is the number-one factor in determining your sales, while at the same time leaving you with happy clients, so use it to your advantage. It is always a win-win for you and your subjects.
I am writing this in February 2017, and you’ve probably heard about all the rain we are having in California. We found this gem of a location a quick hike behind our studio. For this image, I asked Jennifer to run barefoot along the hillside. She wasn’t too happy about the rocks she was stepping on in the grass, but she obliged. The important part was to make sure she was working with the wind. I used a fast shutter speed to freeze the motion and waited until the light was even to shoot this image. It took three takes to get it right. Shooting in continuous mode allowed me to capture one image in a series where the dress was cooperating with the wind.
Get Slow
One thing we have been doing to add motion to our images lately, and will continue to experiment with all year long, is slowing down shutter speed to take advantage of the beautiful images we can create by combining moving elements in our images with a slower shutter speed.
It goes without saying there are a ton of challenges with a slower shutter image. It requires patient clients. Tell them that this will take a few tries to get right so they don’t get frustrated.
As always, light is the first thing we look at. You need to understand how light works to effectively use a slower shutter speed. In certain instances, you may be working with a composite because keeping your subjects sharp is challenging. You need a sturdy tripod. Go with carbon fiber for location portraits to save weight but not lose sturdiness.
To set up an image like this, first we must survey our scene and find our vantage point. My goal was to showcase the moving water around our subjects. I chose a high vantage point because the motion would better emphasize the waves.
The challenge with standing on this rock was that I was not able to get my tripod up there. This meant that I would need to have exceptionally steady hands to keep my subjects sharp. I chose a shutter speed of 1/5th of a second.
Next I leaned up on a rock and put my camera into continuous shooting mode. This allowed me to shoot a series of images slowly without the motion of my pressing down the button affecting sharpness.
For this image, I set up the camera on a tripod. I used the same technique I showed you earlier with the twirling bride, except I did not ask them to walk first. I asked the groom to hold as still as he could, and asked the bride to hold her dress in one hand and twirl it in the other. The shutter speed was set to 1/3rd of a second.
This image was a bit more difficult. I was looking at the leading lines of the clouds, and wanted to see motion in the water leading up to our brides. That would put multiple leading lines converging on the couple. To get this look, I set the tripod in the rocky water with a slow shutter speed. I used flash to ensure the couple would be sharp, and took a separate exposure for the sky and water. I exposed for the sky and for the couple.
Making matters more difficult, I had to operate both the camera and the light, which was a handheld Profoto B2 with a softbox attached. I wasn’t risking that light falling into the ocean. I set the camera to a 10-second delay and pressed the shutter speed. After a few attempts dialing in the exposure on the flash, I got my exposure of the couple and the sky.
To get the motion of the water, I set the shutter speed to 1.6 seconds and took a few frames until the light was just right.
You can see the cellphone BTS video of this image on our website, at www.michaelanthonyphotography.com under the For Photographers section.
Posing Static Motion
I use this technique sparingly because the results are not as believable, but it is required when you are too far from your subjects to provide direction, when you cannot get the fabric of a wedding dress correct or when there is not enough light to capture moving subjects when flash isn’t required.
The best ways to use this technique is with closer images or standard walking shots.
I wanted to create a romantic image for the last spread of this couple’s album, so I posed the bride on a reflective table, lying on her arms. I wanted to create a story of the groom coming down to kiss her on the cheek. The focus of the image would be on her, meaning I wanted most of his face to be in shadow. This was being lit with a constant light, and because the position of the lighting was crucial, I directed it as a normal pose. I had him kiss her cheek, and placed most his face into shadow while leaving some detail in the dark areas.
For this destination wedding in Hawaii, I wanted to create an image of our brides walking down this path. I felt the image would be stronger using motion in the dress, so I had my assistant throw the dress. The dress was a little long in the front and we didn’t want to drag it through the dirt, so we opted for a static motion pose. Our assistant was removed in post-production.
The key to static walking shots is the position of the legs and weight distribution. When people walk normally, their motion carries their weight forward. Therefore, it is advised with posed walking shots to put the weight on the front leg. Pose the outside legs of your couple forward so their bodies are facing each other. When people walk, their gait creates motion in their arms. This is extremely hard to pose. You can have your couple either swing their arms back and forth slowly, or give them something to hold, as we did here with one of our subjects. If you have tried this shot before and it didn’t look like it should, it was probably due to one of the above factors not coming together.
Motion is a great way to add a storytelling element to all your images. If done correctly, it creates emotion in your imagery that will help drive sales. Practice these techniques. Incorporating motion can liven up the images you are used to delivering.
Want more information on this article? Get access to video content and additional supporting images. Launch the April issue of the magazine by logging in or signing up for a free account by clicking here. Shutter Magazine is the industry’s leading professional photography magazine.