Photoshop Banding and How to fix it by Payton Hediger
Why am I seeing banding and what can I do?
The first and most important thing to understand is why banding is showing up in the image in the first place. Banding is showing up because of the bit depth of the image or lack of. In most cases your not going to see banding in 16 bit. However, most images are processed in 8 bit. This is the default setting for images inside of Adobe Camera Raw (ACR) and Lightroom. When shooting in a Raw format your camera probably isn’t capable of capturing your images in actual 16 bit but more than likely it’s between 10 and 14 bits.
Just to give a little perspective on what that means… When using a camera that can capture in 12 bit you expand your tonal range from 256 tones in 8 bit to just over 4000 and over 16000 for 14 bit. Ultimately your seeing over 65,000 tones with 16 bit!
When importing your images into Photoshop with ACR or Lightroom if you change your settings from the default 8 bit to 16 bit you’re not going to gain extra bits of information. The image will still only contain the original bit depth that your camera was able to capture. But the important thing to understand is that you’re not losing any information.
One thing that I should mention. Most displays can only output in 8 bit. This might sway you from utilizing 16 bit but consider this example. Say you’re working with a 10 bit image out of camera and you want to use a clear blue slight gradient sky. You export from ACR this image as 16 bit. Now the image itself won’t increase in bit depth because that information isn’t there and subsequently you may see banding already appearing in the image. However, if you replace the current sky with a gradient adjustment layer, for example, it will be in 16 bit (not exactly because Photoshop doesn’t actually utilize a true 16 bit depth but that’s a story for another time). Now you have a 16 bit sky in a 10 bit image and since this new sky can utilize the 16 bit tonal spectrum you’re less likely to see banding.
Well, you convinced me to switch, how do I export my files in 16 bit?
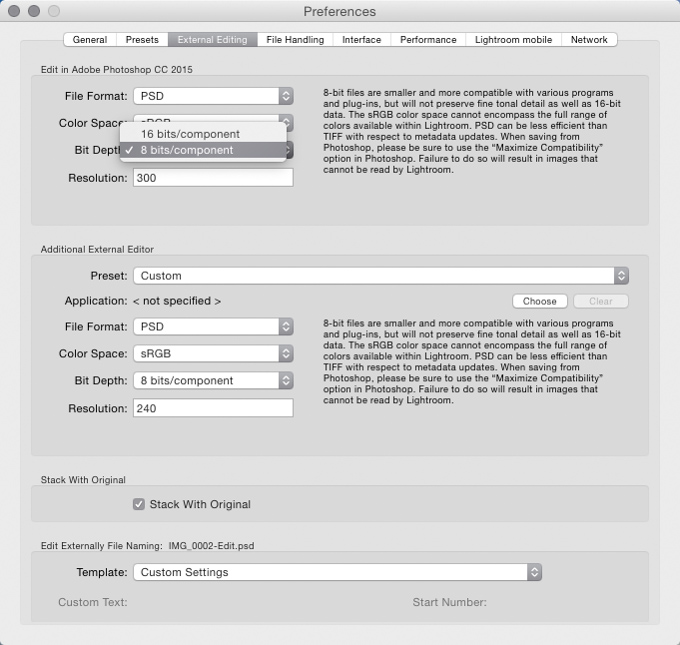
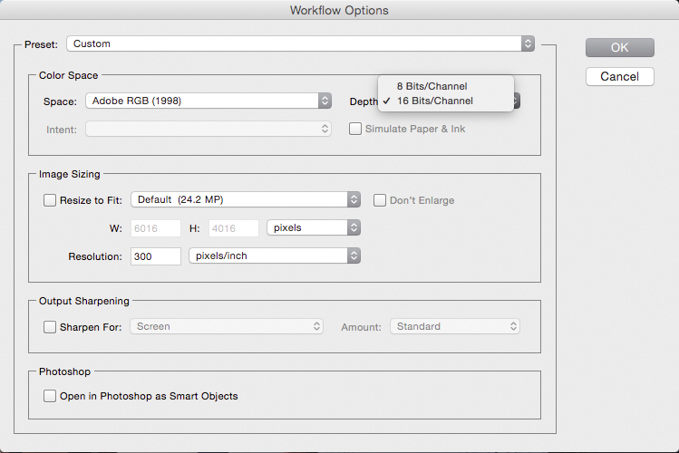
To change the export settings from Lightroom find your preferences (Edit for PC or Lightroom for Mac) then choose External Editing and you can change the Bit Depth from 8 bits to 16. In ACR The settings are at the bottom of the window in blue. Click on the blue text which opens the Workflow Options where you can change the Depth from 8 to 16 bits.
Lightroom Settings
ACR Settings
But how does this translate to why I’m seeing banding in my images?
In an 8 bit image there are only 256 tones to represent the entire image. This means that when you’re seeing banding in the gradients of your image each band is representative of one of those tones. Keep in mind that if the gradient was actually representative of all 256 tones from 0-255 in a small area that you’re probably not going to see banding. However, Banding does become apparent when there are say only 10 tones represented over a large area like a gradient sky. The bit depth of the image doesn’t contain enough information to bridge the tones that need to be there to represent a smooth transition between each band or tone.
So how do I get rid of it?
Banding is aptly named for the bands or stripes of color representative of the tone jumps from lack of bit depth. So to get rid of the banding you just have to break up the bands of color. Here are a couple easy ways to do this.
One of the oldest tricks in the book is to use noise to help reduce the banding issue. However, just using straight noise in my opinion looks terrible. Even in the noisiest images you never see sharp noise in natural photo. So what I like to do is add about .3 – .5 pts of Gaussian blur after I’ve applied noise. I feel like that helps bring back a little of the realism while still being able to break up the banding. As for how much noise to add to the image, that’s going to be a cross between what’s effective and personal taste. (Filter > Noise > Add Noise… > Enter amount, Gaussian, Monochromatic) (Filter > Blur > Gaussian Blur… > Enter .3 – .5 pixel radius)
Another way to help deal with banding is to use the splatter technique. This technique is limited to only 8 bit images since it utilizes “Filter Gallery”. This works by breaking up the bands with a spatter texture. Like the noise technique, how much you use will depend on effectiveness and personal taste. (Filter > Filter Gallery… > Brush Strokes > Spatter)
The last technique and the one I use in the majority of my images is texture. Concrete and metal textures work great for breaking up banding. Apply the texture over the whole image, set it to the “Soft Light” blending mode and reduce the opacity as necessary.
Alrighty then, 16 bit EVERYTHING!
16 bit isn’t always the answer. The files are roughly double the size and they are going to run slower on your computer. There are also many other factors that could be affecting your images from the display, to color space or how the images is being edited. So, even in 16 bit you may still find banding and posterization issues periodically. But as someone despises destructive editing, utilizing a higher bit depth means having a much greater palette to work with.